

Hello Gamer:
Last updated IX/27/2017
Yas 64.852.121.020
Tweet
=================================================
==============================
Top News & HighLights:
Mass Effect Andromeda Tweaks
Last updated IX/27/2017
Yas 64.852.121.020
Tweet
=================================================
==============================
Top News & HighLights:
Mass Effect Andromeda Tweaks
================
Polaris RX 480 BIOS Editor
Still in Developer stage !
Powergate -> Polaris Bios Editor for Win_X
================================================
I will share my Tweaks for Win 8.1
Especially for Phenom II and FX users to fine utilise their Power,
Polaris RX 480 BIOS Editor
Still in Developer stage !
Powergate -> Polaris Bios Editor for Win_X
================================================
I will share my Tweaks for Win 8.1
Especially for Phenom II and FX users to fine utilise their Power,
also guide for Radeon users to Fine Utilise Power of RadeonPRO software.
Please Remember to rise Power % in CAT/OC Utilities for Radeon GPU's !!!
Minimal +10% or the for Best FPS Max +20% so it will be no bottleneck :D
I'm using +8% or for less demanding Games -4% POW.
In Time i will add Windows 10 Performance Tweaks for Radeon/nVidia/Intel users -> Happy Family of Gamers :-)
=====================================================
New Radeon Software Crimson Edition !
Avaible for Win 7/8/10 x64
ATI/AMD Radeon Software Crimson ReLive Edition 18.12.1 pre-WHQL ->
-> Radeon ReLive, Radeon Chill, Radeon WattMan, HDR Gaming Support, VP9 Decode Acceleration
More insights about features can be found in AMD/ATI WEB site !
It's strongly recomended to have CCC installed also for compability reasons !
First Install New Crimsons then CCC and hit restart.
I'm using CCC from Catalyst-15.11.1Beta 64Bit drivers.
I will only install CCC, tick off the RaptR cuz' Crimsons have new ver. of it anyway.
AMD Support Web Page Win 7/8/10
AMD Downloads for Win_X
--------------------------------------------------------------------------------
Ne01 OnnA Presents:Freesync Enabled for everyone !
CRU (Custom Resolution Utility) Tips, Tricks and Monitors OC (LCD/LED/CRT)
1. OC your Monitor
Run CRU as Admin !
Here is New CRU Beta -> cru-1.2.99-p2.zip
Then Set your desired Resolutions + Refresh rates
Here is my Settings for CRT Diamond PRO 2070SB

TIP -> If something goes wrong go into Windows Safe Mode and Hit Reset-ALL in CRU directory !
TIP -> Its always good to have some Vendor Specs for your Monitor (google it) to know what H/V Refresh rates it supporting.
TIP for 1080p LED/LCD users, you can set Refresh Rate 75Hz and/or Custom Resolution:
2200x1125 total, 148.50 MHz pixel clock / 148.5 MHz 2200 x 1125 @ 60.00Hz
Here you Have -> Pixelclock calculator
Also is good to see what resolutions or refresh rates work for your Monitor by setting Custom Resolution in CCC !
2. Enable Freesync for your Monitor
(GPU will have to support it, but you can try to Enable it even if it's not, maby it will work)
In CRU Edit Extensions Blocks and Add Freesync Range.
Here the AMD freesync Demo to test your settings -> AMD_FreeSync_Demo_0_9_1_setup
Pro TIP for Freesync Monitors Users ->
Here you CAN adjust Freesync Ranges easily e.g. from 45-75 to 33-75
Like always look into Monitor Specs and H/V (Horizontal/Vertical) Reresh ranges and set this in here:

TIP:
for any of this Tweaks you need to have ATI .dlls Patched by
-> AMD/ATI Pixel Clock Patcher
Also you can Play with some HDMI settings (if you have HDMI Plug-in LED)
TIP -> Don't set Bit Depth beyound Monitor Spec cuz' you'll have Black Screen Log-in (Run in Safe Mode and Hit Reset-ALL in CRU)

TIP for CRT Users -> Freesync Working as intended but only in 56-120 Range Mode ! (you can test also in 50-120 range but Freesync is based on VESA Monitor standard so in my CRT lowest Refresh is 56Hz, thats why it is working only in 56-120 (and more) range !
Also another interesting finding after Gaming with freesync ON -> HWiNFO64 redings for tW is a lot lower when Gaming: 20-35tW lower readings after 2h of Plaing FC4 (Yes im plaing now this game all't'time)
Before Freesync was 235tW now its at ~200tW !
So Freesync is also Energy tW friendly !
Last TIP -> Always restart you computer to reflect changes !
-----------------------------------------------------
All the Good stuff also here (updated)
1. New Tweaks & Tips + Mods etc. here:
2. New Tweaks & Tips + Mods etc. here:
VEGA
CRU
BIOS related for Radeons GCN/NCU
RadeonMod Tweak Utility main thread
---------------------------------------------------------------
Mantle FIX for BF:4/H etc.
Wanna Play BF:4/H etc. in Mantle on new (great but in DX11/10/9) Crimson 16.6.2 ?
Download and Put into Windows\System32 & SysWOW64
or Copy Mantle .dll's into Game Folder (should work too)
Mantle from CAT 15.12, Tested today and it work like a charm
MEGA Mantle CAT 15.12 download through Browser
AMD Crimson Driver, How to Have Solid Performance + as Rock Stability
First Install Crimson Package on top of Old 15.11.1 driver !
Then install from 15.11.1 the CCC !
Then make sure every .exe in
C:\Program Files\AMD
C:\Program Files (x86)\AMD
C:\Program Files (x86)\ATI Technologies
Have Run as Administrator ! (click right then Properties and add it)
Next don't Turn OFF AMD Fuel Service !!!!! Must be Automatic
Then for AMD CPU's users run icc_patch.exe (availble for download in My Tweaks section)
And make sure you de-malwerize all above Folders + in Windows root: System32 and SySWOW
Scan it and then Patch ! RESTART
Now Add AMD Shader cache for all Games in Crimson/Games Panel
Not Global, but for every game you play:
AMD Shader cache = ON
Tesselation Override = 8 or 16 (Crysis3 have Even Tesselated Frogs and it uses Tess=8)
Also make sure to put AA option you'll need
Next don't use 3rd party Fan Profiles (in TriXX i Have Automatic and in Crimson is also Auto)
Monitor Temps for short period when Gaming/Benching, And you'll be just fine.
UPDATE: Crimson 16.3 driver and new ones has a Vulcan Driver + OGL 4.5
===========================================
How to fix clock throttling in R290/390/Fury Radeon !
Search for TFQ_NA in Regedit.
This will take you to a folder:
HKEY_LOCAL_MACHINE\SYSTEM\ControlSet001\Control\Cl ass\{4d36e968-e325-11ce-bfc1-08002be10318}\0000.
Inside the 0000 folder, you'll see lots of registry keys like "RadeonSoftwareEdition." If you do, you're in the right place!
Add a new DWORD 32-bit key in the 0000 folder and name it:
PP_AllGraphicLevel_DownHyst
Set the value data to decimal 20.
Reboot.
//EDIT: You can also add these DWORD 32-bit keys, as they may also help resolve the issue. This will emulate Catalyst 15.11 behavior.
PP_ActivityTarget (value data 30 decimal)
PP_AllGraphicLevel_UpHyst (value data 0 decimal)
PP_AllGraphicLevel_DownHyst (value data 100 decimal) Note that this replaces step 2+3 above
PP stands for PowerPlay
DownHyst stands for Downclock Hysteresis
(note from me: another Hysteries is in BIOS eg. Temp Hysteresis, applied to GPU Fans ;-))
Now some good news for Fury-X (Fiji ) GPUs !
onedrive.live Fiji Fury-X MOD BIOS download
Made by our user Fox2232 in the Guru3D forums:
the BIOS Mods for Radeon GPUs -> The Fiji MOD with enchanced HBM capablility!
I made it month ago. So, it is fully tested. (based on newest official vBIOS from AMD)
Made few sensible changes:
HBM OC limit 600MHz (+20% from 500MHz base)
HBM Voltage: Unchanged as even +50mV did not improve OC by 5MHz (people who made it to 600MHz+ usually did Hard Mod to capacitors)
GPU OC limit 1260MHz (+20% from 1050MHz base; 2000MHz limit looked too stupid to me on Fiji, maybe Vega)
GPU Voltage: +18.75mV as higher may lead to Power Limit Throttling
Power Limit: Bumped by 20% internally t support OC without decreasing performance as clock goes UP.
Could not find OverDrive +50% Power limit to decrease it to +25%, So for safety, do not put Software controlled limit over 25%.
(But from my testing, card refuses to draw more than 350W anyway, so VRMs which can do 450W+ are safe.)
So, it is not big modification, just little one making sense.
forums.guru3d.com
=============================================
New GeForce drivers :
All drivers in Nudia Web.
gForce Drivers
=======================================
My Thread in forum of Guru3d
================================================
TIPS for Moded drivers Update (for ATI or gForce the procedure is similar) :
All AMD Drivers (included OEM etc. Great for FLEM MOD)
Amd Catalyst Version 15.20.1065 WHQL with chipset+RAID
First download, run setup, after finish don't restart go to:
device manager click on GPU and update drivers then point ->
AMD_Catalyst_xxx\Packages\Drivers\Display\WT6A_INF\ -> and click .inf file
Wait after it finishes and hit restart.
Sometimes it needs a special touch, so go to command prompt and paste:
bcdedit -set loadoptions DISABLE_INTEGRITY_CHECKS
bcdedit -set TESTSIGNING ON
To turn it on again, after instaling Moded drivers just use these commands:
bcdedit -set loadoptions ENABLE_INTEGRITY_CHECKS
bcdedit -set TESTSIGNING OFF
=================================================
Also Power User -> TheOneofGod and Me from Guru3D started making the Radeon Registry Utility !
First AMD_Registry_Editor_v0.0.1 and Now we Have ver. 1.0.15

Download AMD_RadeonMod 1.0.15a
"Right click individual key names to set new value, set default value. I've added help there too using bits of information gathered by OnnA-LoccOtHaN."
We all can contribute in development -> see our Main Thread in Guru3D Radeon Section
Here is my space in forums of Guru3d
Coder/Programmer & Additional Tweaks: TheOneOfGod
Main Support, GPU + Tweaking Knowledge: OnnA Ne01_LoccOtHaN
Our Main Thread's in Guru3D Forums
AMD Registry Editor Guru3D Thread
Official Guru3D Download Section
1.0.13 [19/01/2016] -
Added DXVA -> Fluid Motion Value (Crimson).
Added DXVA -> Steady Video Value (Crimson).
Fixed "Restart Driver" with multiple Radeon GPU's.
Fixed "Restart Driver" with Dual Graphics.
=============================================
Radeonpro Main
Radeonpro Blogger
MODS for RP 1.1 or 1.1 beta SweetFX 1.51 with Main.H code Tweak
My Mega Link
NVIDIA Inspector
==========================================
============================================================


================================================
This is List af known Radeon Registry Tweaks, based on ATI Tray Tool and RadeonPRO:
Standard Tweaks
Geometry Instancing: This is covered in the Catalyst Control Center section of the guide, and should be enabled in most cases.
Force Mip-Map Filter: Enabling this option improves the quality of textures in some games, although ideally you should use the regular Mipmap Detail Level setting to control Mipmap quality.
Z Compression: Controls the compression of the information held in the Z-Buffer. By enabling higher levels of compression (such as 'High'), you will see a performance improvement, but you may also see graphical anomalies. Default is the normal and recommended option, as it already provides some level of compression without image quality loss.
Fast Z Clear Enable: If enabled this option increases performance by clearing the Z-Buffer more quickly. As such it should always be enabled (ticked). Only untick this option if you experience Z-Buffer-related problems and want to experiment to see if this is the cause of it. Disabling Fast Z Clear will reduce performance noticeably.
Z Mask: Z Mask when enabled uses your graphics card hardware to prevent the Z-Buffer from being filled with unnecessary information. Strangely, many users report faster performance with Z Mask disabled (unticked), as well as less likelihood of graphical anomalies, so I recommend unticking this option to begin with to see if it works for you.
Z Top Disable: The Z buffer is not restrain by aplications.
Disable DMA Copy: I am unclear what this option does, but it is unticked by default, and it's not Direct Memory Acess. What i see is more FPS in all games i play: Crysis3, BF4, UE3 & UE4 also benefit with DisableDMACopy=1
Disable Block Write: Using Block Write should result in faster writing of graphics information to the VRAM, but some people report performance issues with it enabled (unticked) as it may be queing information instead of writing it immediately. So if you want to experiment, untick this option, try your favorite games or graphics benchmark and see if performance has improved or decreased for you. I recommend Enable it (see Radeon Tweaks in Main 1st Pg.)
WMV Acceleration: This setting is available in the regular CCC. It should be enabled to provide hardware accelerated Windows Media Video playback. (Today is always On)
==============================
Advanced Direct3D Tweaks
As the title suggests, these tweaks only work in Direct3D games, and have no impact on OpenGL games. Fortunately most games are Direct3D; there are very few OpenGL games (Doom/Quake-based games are OpenGL).
Fog Options: There are a range of Fog-related options here, including the option to enable hardware support for Table Fog, W Fog, Z Fog, Vertex Fog and Discrete Fog. For all intents and purposes you shouldn't need to manually enable/disable these, as your graphics card hardware should automatically provide support for the appropriate fog rendering method a game requires. However if the fog effects in a particular game look odd or incorrect - especially older games - I suggest firstly making sure Table Fog (Pixel Fog) support is enabled, then W Fog, and finally enable the other options if you still have problems. These options are really only for troubleshooting purposes.
Export W Buffer: This option enables W Buffer support for games which use it. The W Buffer is an alternate depth rendering technique to the Z Buffer. You should tick this, however ticking this option doesn't force-enable the W Buffer on recent ATI cards because they may not have hardware support for W Buffer usage in the first place.
Fast Color Clear: Enabling this should result in improved performance without noticeable image quality drop, as color information is cleared more quickly from the frame buffer. However it should already be enabled by default in the hardware, even if not indicated here.
VoltxEnable: This option controls support for Volumetric Textures, which should be enabled.
Color Compression: Enabling this should result in improved performance without noticeable image quality drop by compressing color information and hence allowing more information to fit into Video RAM. This should already be enabled by default in your hardware, even if it's not indicated here.
Export MipMap Cube Maps: Enabling this should provide support for Mipmap textures on Cube Maps. Cube Maps are a trick to show reflections of surroundings on static reflective object surfaces with minimal performance cost, and Mipmaps are a series of pre-scaled textures used to improve rendering performance as an object recedes into the distance. Once again, this should already be on by default, but you can tick it to make sure it's enabled.
Export Signed Vol Textures: I have no idea what this setting does. I assume it allows support for a particular Volumetric Texture type/method.
Line AA Enable: This option refers to Line Antialiasing - antialiasing which only works on lines, not the outlines of shaded or filled objects (e.g. powerlines in a 3D game). Enable this and test in a game to see if thin standalone lines become less jagged at the cost of some performance.
Enable Raster Guardband: This option controls Hardware T&L Guard Band Clipping, which is an optimization technique to improve video performance by only clipping (removing) certain portions of the 3D world, and this in turn saves CPU time. It should be enabled by default, but enable it here anyway. Only disable if you notice a reduction in performance or you see visual glitches.
Allow Macro Volume Textures: I have no idea what this setting does. I assume it allows support for a particular Volumetric Texture type/method.
Force Compressed Stencil Buffer: The Stencil Buffer is shared with the Z Buffer and most often controls effects like shadows in games. Ticking this option forces the stencil buffer data to be compressed, which may improve (or hurt) performance depending on the game; you should experiment to see which works best for you.
Constant Compare Enabled: I have no idea what this setting does.
Support for Non power of two size textures: This option enables support for non-standard texture sizes, and should be enabled.
Support for Displacement Maps: Unlike Bump Maps which are a trick to simulate bumps, scratches and dents in objects, Displacement Maps allow objects to show actual depth characteristics, even when viewed from the side for example. This technique is used in recent games, so support for it should always be enabled.
Adaptive NPatch Support: N-Patch is an ATI-developed technology for making 3D surfaces more realistically curved, and is used by ATI's TruForm technology. However this requires support in games to function properly, and most games do not support TruForm or N-Patch.
Tiling Settings: These settings control support for various texture surface tiling methods. I recommend enabling them all, as they all should be supported by your graphics card and may be used in particular games to improve performance as necessary.
Advanced OGL Tweaks
These tweaks only apply to Old and New OpenGL games, such as those based on the Doom/Quake/Rage/Wolfenstein engines.
Force Vertex Cache for Iris: I have no idea what this setting does.
DitherAlpha: If enabled, Alpha Textures - that is textures with transparent areas (like chain link fences) - will be dithered. This means the colors are blended more smoothly and hence should look better. Disabling this may resolve any visual glitches and may improve performance in OpenGL games, but will show more color banding (i.e. more noticeable color gradation).
Disable FGL AGP: Not clear what this setting does, perhaps it's related to disabling the ATI FireGL graphics card series' AGP function.
Export OpenGL 2.0 Procedures: Should be enabled, as this provides support for OpenGL 2.0 functions. You should only disable this if an OpenGL game or application is not functioning properly.
Multi Thread Support
Enable MT Support: If you have a multi-thread capable CPU, that is either a dual/multi core CPU, or a CPU with HyperThreading (virtual dual core) technology, you can enable this option for a potential performance improvement. You should leave the 'Minimum Working Threads' to 0 and set the 'Maximum Working Threads' to a value like 2 to start with. Play some recent 3D games and see if you get an actual improvement in performance, and also note if there is any additional instability caused. If it remains stable and you also notice a performance improvement, raise the Maximum value to 4, 6 or 8 for example and again experiment. In New CAT Drivers it's Native now, so driver have full access to CPU resources. Bigest gain in Win_X x64 and Win 8.1 !
=============================
Based on ATI Catalyst Tweak Guide by Koroush Ghazi and my experience with Radeon Tweaking from ATT X1950, 3850 and R280X.
Many of them (Options) are in CAT Registry today.
=======================================================
Also for AMD FX x8 Users ->
AMD FX x8 Optimizer BDC R1.03B
AMDx8_Optimizer_BDC_R1.03B
Also for x6 x8 etc. CPU users You'll need to unpark CPU Cores to Boost Performance in x2 x4 Games/Apps
Cuz' Still some Modern Games don't utilise more than 4 cores ! So you'll have to UnPark Them and Gain some Performance !
-> Read and Download Here ->
Disable-CPU-Core-Parking-Utility
======================================
CrossFire in Every Game !
Download RadeonPro and create a that Game profile.
Force the crossfire profile 'AFR Friendly D3D' and set the MVPUMode to 'Alternate Frame Rendering'.
then Force in RP desired FPS eg. 60/120/144 etc.
And its Done :D
Also in MSI AFTERBURNER !
CLICK SETTINGS GEAR (COG)
THEN FIRST PAGE -> General Tab
LAST HEADER AT THE BOTTOM -> AMD compatibility properties
Unofficial overclocking mode ->
DROP-DOWN BOX ->
without PowerPlay support
It makes difference for Fury X (and x2) + R3xx !
===================================================
And now as for CPU's from AMD (the Phenom/FX one with SSE etc. new instructions set)
Using this simple and intuitive application, you can easily patch files that were compiled with the Intel Compiler for better performance
Intel Compiler Patcher is a comprehensive piece of software developed to offer you the means of tweaking certain EXE, DLL, ACM, AX, CPL and OCX by default files that were compiled using Intel C++ Compiler from your computer and optimize them for your processor by deactivating their CPU Dispatcher, thus increasing their general performance when run on other types of CPUs.
Scan your folders and choose the files you want to patch
Program makes backup files in patched file directory with ext. .org
www.softpedia.com/get/Intel-Compiler-Patcher
===========================================
PhenomII and FX series CPU's will have a little OC touch to Gain some Hidden Performance:
ALways set FSB to min 232-243 or if you have Great Mobo give it a try and set >260FSB !! it will unlock CPU some GT/s also the wider the better !
Next TIP:
PhenomII series ->
NB always 2.8GHz no less ! (important for Memory bandwidth )
HT always 2.3GH or 2.5GHz (important for GPU's)
PhenomII x6 -> OC to MAX 4.1GHz (no need for More)
Sweet spot is 3.8GHz-4Ghz
PhenomII x4 -> OC to MAX 4.5GHz (no need for More)
Sweet spot is 4Ghz-4.2GHz
FX series ->
NB always 2.6GHz but no more ! (important for Memory bandwidth )
HT always min. 2.6GHz (important for GPU's)
FX x6 OC to MAX 4.5GHz (no need for More)
Sweet spot is 4.2GHz
FX x8 OC to MAX 5GHz (no need for More)
Sweet spot is 4.2GHz-4.5GHz
Also remember to rise a little V on NB,HT etc. in BIOS
===========================================
Also Great for Gamers and Audio Maniacs.
The Timer Resolution Tweak to 0.5 millisecond !
No More stutering/tearing on LCD Monitors.
Also Great for CRT gamers -> game responce is much quicker.
Timer Resolution
THX to Creator below original Web Page:
Mr. Lucas Hale Web
===========================================
Now Intel CPU's:
Always give some OC to it
SB i5/i7 give 4.2-4.8GHz
IB/Haswell give MAX 4.4GHz
Extreme i7 x6 give MAX 4.2GHz to 4.4GHz (no need for more)
Extreme i7 x8 give MAX 4.0GHz-4.2GHz (no need for more)
Warning ! You'll need Good CPU Cooler (not BOX!)
Also rise a little CPU Vcore for Stability !
Tweak some PLL also ;-)
Temps should be around 68-75 deg.cels. MAX (its safe here)
Of course the MAX is the MAX ;-)
Files You'll need are in FOLDER/Zz Gamers Soft You NEED
=====================================
My PhenomII x6 on Sabertooth 990FX OC for Gaming.
Screen:

==========================================
Another great Performance Tweak:
MFT Zone Size:
HKEY_LOCAL_MACHINE/SYSTEM/CurrentControlSet/Control/Filesystem
Select Filesystem and then in the right pane double-click on the item NtfsMftZoneReservation
Change the value to 1 – 4 to change the reserved disk space of the MFT file:
Value 1: 12.5% of free space, default
Value 2: 25% of free space (that's best for every Gamer)
Other Values:
Value 3: 37.5% of free space
Value 4: 50% of free space
========================================
Also in BIOS Turn OFF HPET or in Win 7/8.1
1. Go to Device manager and expand the "System Devices" section.
2. Look for High Precision Event Timer. Right click on it and click disable.
It will give you some more Procesing Power to Games (more FPS)/Apps (faster)
It's the same Gain for AMD or Intel CPU's !
Also:
Run CMD with Administrator Rights and copy this:
And Turn ON/OFF HPET:
bcdedit /set useplatformclock true
bcdedit /set tscsyncpolicy Enhanced
bcdedit /set disabledynamictick yes
bcdedit /deletevalue useplatformclock
bcdedit /deletevalue tscsyncpolicy
bcdedit /deletevalue disabledynamictick
To view bcdedit settings:
bcdedit /enum
==============================================
GodMode in Win_X let you customize every aspect of you'r Window's.
Generally it's for Power Users or People with solid background knowledge of that OS.
Create a new folder on your desktop: right-click on Windows 10 desktop and on the context menu, click on New > Folder.
Name this newly created folder:
GodMode.{ED7BA470-8E54-465E-825C-99712043E01C}
Enter that folder and..... everything you need is here :-)
================================================
Also some Tweaks for Gamers in Win_X :
Optimal online gaming experience Tweaks
If you want the optimal online gaming experience, go to Advanced tab of your Ethernet adapter settings, and disable the following:
* Interrupt Moderation - clumps packets together and sends them as a batch - the main offender
* Flow Control - sounds counterintuitive to disable it, but it messes with existing flow control in Windows networking stack
* Receive Side Scaling - also messes with Windows networking stack
* [anything goes here] Checksum Offload - supposed to speed up performance by offloading TCP/UDP checksumming to hardware; in reality does nothing for an average desktop PC except interfere with Windows networking stack
* Green Ethernet - performance-eating eco garbage
Try it and see -> more headshots in your favorite FPS, responsive gaming, less disconected issues etc etc.
Also, if you play a MMORPG and want faster responsiveness, you need to disable TCP/IP Nagle algorithm in Windows. There are multiple guides about it though.
Disable Telemetry Tweak Utility
Ultimate Windows Tweaker 4
Control Panel -> Admin Tools -> Shedule Tasks (window pops up)
All below can be safely Disabled (in Dir. Microsoft/Windows)
-> Application Experience *
-> Appx deployment Client *
-> Autocheck *
-> CloudExperienceHost *
-> Customer Experience Improvement Program * (customer sniffer ;-)
-> Diagnosis
-> Feedback\Siuf *
-> LanguageComponentsInstaller
-> Location *
-> Maintenance
-> Maps *
-> NetTrace *
-> Offline Files
-> PI (Secure-Boot-Update i Sqm)
-> Power Efficiency Diagnostics
-> Ras
-> RemoteAssistance
-> Shell (all but not this one - CreateObjectTask) *
-> SoftwareProtectionPlatform
-> SpacePort
-> TextServicesFramework *
-> Time Synchronization i Time Zone *
-> TPM
-> User Profile Service
-> WCM
-> WDI
-> Windows Defender *
-> Windows Error Reporting *
-> Windows Media Sharing *
-> Workplace Join *
Please Read !
*- means some sort of Customer sniffer (safe but unneeded for Gamers)
Free Up some resources thanks to that Tweaks.
If you have doubts just google the variables and see what you'll need.
Some of Tweaks not good for Laptops.
Some of them is for automated Maintenance in Win_X (i do maitenance by myself so its unneeded for me )
============================================
Windows 10: How to Protect Your Privacy and thanks to that Tweaks -> Free ~150-300MB in RAM and Net Speed/Ping
We Are Gamers we need every posible resources we can get ;-)
Stop Bone Collector ;-) (telemetry and Data Collection in Windows 10 )
Command Prompt/Power Shell as Admin
sc config DiagTrack start= disabled
sc config dmwappushservice start= disabledsc
stop DiagTracksc
stop dmwappushservice
run Gpedit.msc
>Administrative Templates>Windows Components> Data Collection and preview builds>allow telemetry
Set to Enabled/Disabled
1. Enabled (togle user control....)
2. Disabled
3. Default (as it is)
Atomated Scripts (THX goes to Sergey Tkachenko and Wade )
Also we can remove all Apps bundled with Win_X and leave Store and Calculator working (you can edit script in notepad ;-)
Here ->
Tweak Script
Run As Admin or Paste to Comm.Prompt as admin
Automated script to Permanently STOP Telemetry and Data Collection + Some related Net Tweaks also
Here ->
Tweak Download
Also after Sign-in into M.S Account and Win_X Activation Process you can Log-in into Local Account.
Important -> Make Sys BackUp (You can Revert to previous state ;-)
Update 1
Now i can clearly show you better option (less invasive and Win_X works as usual with some boost ;-)
run Gpedit.msc
>Administrative Templates>Windows Components> Data Collection and preview builds>allow telemetry
and here change only second option (give disabled)
Next:
HKLM\SOFTWARE\Policies\Microsoft\Windows\
Here create Key
DataCollection
and give Dword32 Value:
AllowTelemetry and write 0 (means Disabled)
Now Windows Update should work as intended :banana:
And we have freed some resources and Ping :D
Also in Settings/Updates/Advanced Options Change how Upd. are delivered to Only My PC (not in Network, that option will seed updates to others as well -> You can Keep it or Disable it)
Win_X Block/Unblock Updates -> Total control of Update Delivery (if you don't need some of'em, just Turn it OFF :pc1: )
Here link for MpS Hide/Show Updates:
wushowhide.diagcab Download
Another usefull Tweak to turn OFF Net Usage associated with Win Telemetry ;-)
Please add following to the HOSTS ( C:\Windows\System32\drivers\etc )
First click right button and T.Off the Read Only ;-)
After That you will Have much Better PING and Net Responsivness.
Great for Multiplayer Games PING !
0.0.0.0 vortex.data.microsoft.com
0.0.0.0 vortex-win.data.microsoft.com
0.0.0.0 telecommand.telemetry.microsoft.com
0.0.0.0 telecommand.telemetry.microsoft.com.nsatc.net
0.0.0.0 oca.telemetry.microsoft.com
0.0.0.0 oca.telemetry.microsoft.com.nsatc.net
0.0.0.0 sqm.telemetry.microsoft.com
0.0.0.0 sqm.telemetry.microsoft.com.nsatc.net
0.0.0.0 watson.telemetry.microsoft.com
0.0.0.0 watson.telemetry.microsoft.com.nsatc.net
0.0.0.0 redir.metaservices.microsoft.com
0.0.0.0 choice.microsoft.com
0.0.0.0 choice.microsoft.com.nsatc.net
0.0.0.0 df.telemetry.microsoft.com
0.0.0.0 reports.wes.df.telemetry.microsoft.com
0.0.0.0 wes.df.telemetry.microsoft.com
0.0.0.0 services.wes.df.telemetry.microsoft.com
0.0.0.0 sqm.df.telemetry.microsoft.com
0.0.0.0 telemetry.microsoft.com
0.0.0.0 watson.ppe.telemetry.microsoft.com
0.0.0.0 telemetry.appex.bing.net
0.0.0.0 telemetry.urs.microsoft.com
0.0.0.0 telemetry.appex.bing.net:443
0.0.0.0 settings-sandbox.data.microsoft.com
0.0.0.0 vortex-sandbox.data.microsoft.com
0.0.0.0 survey.watson.microsoft.com
0.0.0.0 watson.live.com
0.0.0.0 watson.microsoft.com
0.0.0.0 statsfe2.ws.microsoft.com
0.0.0.0 corpext.msitadfs.glbdns2.microsoft.com
0.0.0.0 compatexchange.cloudapp.net
0.0.0.0 cs1.wpc.v0cdn.net
0.0.0.0 a-0001.a-msedge.net
0.0.0.0 statsfe2.update.microsoft.com.akadns.net
0.0.0.0 sls.update.microsoft.com.akadns.net
0.0.0.0 fe2.update.microsoft.com.akadns.net
0.0.0.0 diagnostics.support.microsoft.com
0.0.0.0 corp.sts.microsoft.com
0.0.0.0 statsfe1.ws.microsoft.com
0.0.0.0 pre.footprintpredict.com
0.0.0.0 i1.services.social.microsoft.com
0.0.0.0 i1.services.social.microsoft.com.nsatc.net
0.0.0.0 feedback.windows.com
0.0.0.0 feedback.microsoft-hohm.com
0.0.0.0 feedback.search.microsoft.com
0.0.0.0 rad.msn.com
0.0.0.0 preview.msn.com
0.0.0.0 ad.doubleclick.net
0.0.0.0 ads.msn.com
0.0.0.0 ads1.msads.net
0.0.0.0 ads1.msn.com
0.0.0.0 a.ads1.msn.com
0.0.0.0 a.ads2.msn.com
0.0.0.0 adnexus.net
0.0.0.0 adnxs.com
0.0.0.0 az361816.vo.msecnd.net
0.0.0.0 az512334.vo.msecnd.net
=======================================
Clear the log located in “C:\ProgramData\Microsoft\Diagnosis\ETLLogsAutoLogger”
Remove both Tele. services:
Disable: Set the “Start” registry key for both services to 4 (Disabled) [3 is Manual, 1 & 2 Auto]
Located at “HKEY_LOCAL_MACHINESYSTEM\CurrentControlSet\Services”
1. diagnosticshub.standardcollector.service
2. DiagTrack
PS. Also in that Logs (we can Open it using HexEditor ;-) I've noticed that MS don't collect any of Private Info about User !!!
All in there (You can check by yourself) is related to Windows and Drivers etc. eg. SB-Z, Razer and so on...
So i think it's little misunderstanding So called Data Private Collection (security concerns etc.)
But in BF4 multi I got 6-8 PING Gain !!! -> Yeah
===========================================
Also make change in reg:
Windows Registry Editor Version 5.00
[HKEY_LOCAL_MACHINE\SOFTWARE\Microsoft\Windows NT\CurrentVersion\Multimedia\SystemProfile]
"NetworkThrottlingIndex"=dword:ffffffff
"SystemResponsiveness"=dword:00000000
[HKEY_LOCAL_MACHINE\SOFTWARE\Microsoft\Windows NT\CurrentVersion\Multimedia\SystemProfile\Tasks\Games]
"Scheduling Category"="High"
"SFIO Priority"="High"
"Background Only"="False"
"Priority"=dword:00000001
"Clock Rate"=dword:00002710
"GPU Priority"=dword:00000001
"Affinity"=dword:00000000
Please copy this into text document .txt
and rename it to PowerPlan.reg and merge into registry d.click :-)
========================================
Games don't work/Start or Save?
Right click on Games/Steam/Users etc. Folder and Security (also is good to check all Games Folders)
Advanced and change ownership - write Administrators (wait and close all)
Then after that (in Security Tab) click in EDIT and edit Admin/Authenticated Users and Users Permissions to Full Controll !
Also is good to Have in all of that folders the /Users/ Profile with Full Control !
Now games will Save Game and run NP !
Work in Se7eN, 8ight and Win_X !
============================================
Now some SB-Z Tweaks you might need for Gaming
Tested on 5.1 Configuration.
New Working WHQL Drivers for Win_X
Creative_SBz_6.0.102.0037_Win_X
All you need is Install PAX Modified Drivers from my Cloud/SB_Zx folder
or from PAX in here ->
New PAX For Win_X THX Robert :-)
PAX for Win_X SB-z etc.
HardwareHeaven Forum
You can have OpenAl sound positioning in almost every game :-)
Plus OpenAL is faster than DX and Fully Utilise Creative SB Hardware !


==========================================
============================================================
First Install RadeonPRO
1). Open
Radeonpro (always run as admin if you're on win 8.1 and click ok on
warning msg), in the bottom right corner, it will say 32 bit highlighted
in blue. Click on it. Wait a second. Click again. Do that until the
blue text changes to 32/64 bit.
2) Then click on settings, the little cogs icon.
3). A settings window will appear. Click on "Sweet FX settings" in the left hand side option panel
3). A settings window will appear. Click on "Sweet FX settings" in the left hand side option panel
4).
In Sweet FX settings, check the "Enable SweetFX integration" checkbox.
Then, click change on the SweetFX files root location option and point
it to wherever you put my Radeonpro preset folder you downloaded.
5). Assign any hotkeys you want and then click save to close settings.
5). Assign any hotkeys you want and then click save to close settings.
6).
Once the setting window has closed from clicking save, click on add new
profile, the + icon within the main window of RadeonPro.
7). An explorer window will appear. Browse to your Game install folder and select your game exe file, so Game_name.exe
8). Now on the profile you just created, then click on the SweetFX tab on the right hand side of the program
9). Now right click the game profile and click "Apply Now"
9). Now right click the game profile and click "Apply Now"
10).
Close Radeonpro to tray and you're done :dance: i recommend to launch
your game through Radeonpro, just right click Radeonpro tray icon,
select launch and then select your game.
Pro TIP for Windows_X x64 Users:
Please go into RadeonPRO main Folder and make sure that every .EXE file in it has: Run as Administrator
And don't worry about RP warning at Start, just click Yes !
==================================
Please go into RadeonPRO main Folder and make sure that every .EXE file in it has: Run as Administrator
And don't worry about RP warning at Start, just click Yes !
==================================
If you want to import settings for a Game:
Simply ->
Check "Enable SweetFx" checkbox and
click on "Import settings...". Browse using the file explorer and point
the program to the SweetFX_Settings.txt file inside the
folder you downloaded that .txt.
Here is Tweak to make GTA5 work with RP+SweetFX
================================================
Also here are the CCC tweaks:

Also here are the CCC tweaks:
To enable in CCC some features
Just Merge into REG this 2 files i make for you :-)
Or look into this files in Notepad (click Edit) and make similar in your registry.
That's safe aproach, cuz sometimes H/W code is different in registry.
Click Run and write regedit then enter
(Please do BackUp, in Registry/Computer -> Export All)
Here are the Reg merge files ->
My MEGA Cloud
or Ziped Reg Files
All files are there for You :-)
System Mods, RadeonPRO + SweetFX 1.5.1 and OpenAL etc.
in Directory / Zz Gamers Soft You NEED
========================================
Here interesting Tweak i make with Legacy MOD FLEM (Ver 2.0) ->
Download here Digital FLEM All Radeons MOD !
The Disable DMAcopy Is working OK and there's a small boost in Low side FPS ! Tweak IT
And in Shadow Of Mordor Ultra/High with Ultra Textures i have:
-> Now 54FPS average and 40FPS Low
-> before 52FPS average and 29FPS Low
So we have first Great Tweak for GCN using FLEM -> THX goes to Creators !


Warning GCN !
The BlockWrite Tweak now with CAT 15.9.1 Beta works Perfect so enable it with DMA Copy !
================================================== =========================
The Registry Tweaking Guide for Radeon GPU's !
Open Regedit (click Run and enter: regedit ) Find Driver section:
[HKEY_LOCAL_MACHINE\SYSTEM\CurrentControlSet\Contro l\Class\{4d36e968-e325-11ce-bfc1-08002be10318}\0000]
Interesting Features/Options Highlight:
Shortcut NA means not avaible/selectable so the NA=0 means is Avaible !
and dword:00000000 ( last digit 0 is OFF and 1 is ON )
Please reboot after Tweaking !
--------------------------------------------------------------------------------------------------"GI_NA"="0" (ability to turn OFF Geometry Instancing, Avaible in Task CAT Icon only! )
"AreaAniso_NA"="0" (turns On better Aniso Filtering, also more demanding and looks better, Avaible in Task CAT Icon only!)
"AAF_NA"="0" (turns ON more AA Options, Avaible in Task CAT Icon only!)
AntiAlias_NA (gives Options in Tray/CAT for more AA options)
"EQAA_NA"="0" (Enchanced Quality Mode for AA, More demanding, avaible in CAT AA dropdown )
"TemporalAAMultiplier_NA"="0" (Yet another usefull AA menagment, you can go to 32xAA ! )
"MLF_NA"="0" (ON/OFF Morphological AA in CAT)
"Gamma_NA"="0" (Set Gamma in Movies/Games ?)
"SurfaceFormatReplacements_NA"="0" (in CAT you can turn ON/OFF the Texture compresion Format for the Favour of Radeon GPU's, I have ON, something wrong with Textures try OFF ;-) )
TFQ_NA (texture Filtering Quality -> gives Option in Tray for Aniso Quality if OFF/0)
"TextureLod_NA"="0" (Turns ON ability to Crank Up textures renderig Quality to VeryHigh, default in Drivers ON)
"CameraShakeMotionDetect_NA"="1" (CAT Video Section related)
"EnableUlps"=dword:00000001 (It means GPU will save Power 300/150 for Desktop or Web crusing ;-) )
"KMD_EnableLPT"=dword:00000000 (Kernel mode setting, see Wiki, I think its for Older GPU's Reg entrie, For GCN it's Obsolete)
"3D_Refresh_Rate_Override_DEF"=dword:00000000 (Refresh overide ON/OFF so 00 is OFF and 01 is ON, change only last digit ! )
"Display_Detection_DEF"=dword:00000000
"Panning_Mode_DEF"=dword:00000000
"Force_TV_Detection_DEF"=dword:00000000 (no need for Guide here ;-) )
"ACE"=hex:31,00 (ACE is ON if you wanna OFF change to 30,00)
"KMD_FRTEnabled"=dword:00000001 (Frame Rate limiTer FRT Enabled )
"KMD_MaxFrameRateRequested"=dword:0000003d (here is my 61FPS, you can set whatever you'll need 30,120,144 etc. Remember it's HEX value!)
"VgaCompatible"=dword:00000000 (OLD Games don't work? turn that baby ON, along with: Legacy Components/DirectPlay in Windows Features )
"Adaptive De-interlacing"=dword:00000001 (is ON Feasibility of real-time applications is given as well as the coding efficiency tested by the Audio Video coding Standard (AVS) Great and New Technique for De-interlacing Videos)
"VPE Adaptive De-interlacing"=dword:00000001 (is ON Analog filter adaptation using a dithered linear search algorithm, another Great and New Technique for De-interlacing Videos)
StaticGamma_NA (Static Gamma for Movies)
"ASTT_NA"="1" (Adaptive Sampled Transparent Textures, AA on textures with transparency which did not have proper 8bit alpha)
"DALNonStandardModesBCD1" and "DALNonStandardModesBCD2" (basicly you can enter here your desired Resolution with Refresh rate, it is Default for Games etc. - my example: 17,92,13,44,00,00,00,90 it means: 1972:1344 in 90Hz)
"EnableLBPWSupport"=dword:00000000 (?)
"PP_MCLKStutterModeThreshold"=dword:00030000 (GPU to Monitor Delay Times in ms, We don't know too much about it but feel free to experiment, Try 15000/7500/5000/3000/2000 or for 1ms LCD 1000)
"StutterMode"=dword:00000002 (This is Stutter Mode Switch, avaible Options are: 0,1,2 - 0 means OFF)
"KD_TilingMode"=dword:00000000 (I think is Old School Tiling Texture Mode, default is OFF for GCN )
"AdapterDesc"="AMD Radeon R9 200 Series"
"ColourDesktopGamma_DEF"="1.0 1.0 1.0" (this is for Desktop + Movies Playback Calibrations)
"ColourDesktopBrightness_DEF"="0 0 0"
"ColourDesktopContrast_DEF"="1.0 1.0 1.0"
"ColourFullscreenGamma_DEF"="1.0 1.0 1.0" (this one is for Fullscreen Colour etc. Calibrations e.g. For My CRT i have 1.2 Gamma)
"ColourFullscreenBrightness_DEF"="0 0 0"
"ColourFullscreenContrast_DEF"="1.0 1.0 1.0"
"Display_Detection_DEF"=dword:00000000 (Monitor Detection Switch 1/0 ON/OFF )
"EdidPersistenceIsOn"=hex:00 (EDID Monitor Persistence Override)
"Panning_Mode_DEF"=dword:00000000 (Panning mode on Monitor switch 1/0 ON/OFF )
! Great Tweak -> in Radeon Reg. Tweak now avaible:
"DisableDMACopy"=dword:00000001 ( is not Direct Memory Access! IMO, is a GPU to VRAM related Tweak - It's Safe Approach to give 0 keep it enable. You have to test it in 1 and see what's best for You, some people including me have FPS Gain in Desabled State - Crysis3, BF4, HoM&M VII)
"DisableBlockWrite"=dword:00000000 ( Result in faster writing of graphics information to the VRAM, You can Enable it in GCN 1 or 0 )
Another Great Tweak for Dx9 Games FPS Boost (you'll have to put this in TXT.REG and merge, I've e-mail this to our coder so it will be in RadeonMOD):
"KMD_APlusISharedMiniSegmentSize"=dword:000004 14
"KMD_APlusISharedMiniSegmentOptions"=dword:0000041 7
================================================== ========================
And Now another section the UMD ->
[HKEY_LOCAL_MACHINE\SYSTEM\CurrentControlSet\Contro l\Class\{4d36e968-e325-11ce-bfc1-08002be10318}\0000\UMD]
"GI_DEF"="1" (DEF means Definition and is basicly for ON=1 or OFF=0 and sometimes you can set there 2,3,4 )
"Main3D"=hex:33,00 (Main3D - Filp Queue Size. Render Frames ahead, default option is 3 Frames Ahead, always set like this: 30,00 - 35,00 etc and see Next)
"Main3D_DEF"="3" (Must be set like above. Avaible switches: 0,1,2,3,4,5)
"AreaAniso_DEF"="0" ( Follow above rule eg. 0 = App. controled, 2,4,8,16 Forced Mode)
"AnisoType"=hex:30,00 (it means is App. controled, we can lower it for FPS boost but we will have lower Image Quality: 32,00-31,36 )
"AnisoDegree"=hex:31,00 (it means is ON and have 360 degree, i think we can lower degree for FPS boost but we will have lower Image Quality)
"AnisoDegree_DEF"="1" (is ON combined with above option )
"TextureOpt"=hex:30,00 (give 31,00 No Visible Quality loss but increase in FPS and fater Texture drawing/See down)
"TextureOpt_DEF"="0" (is Texture Optimisation Tweak, 1 for ON)
"TextureLod"=hex:31,00 (Texture Level of Detail switch 31,00 means ON)
"TextureLod_DEF"="-1" (Texture Level of Detail switch, You can give sharp to blurry, for More sharp give: -1 for blurry: 1)
"TruformMode_DEF"="0" (OLD trueform is OFF the Teselation predecessor, You can turn it ON for eg. in NWN2 and games that support it, more in Wikipedia Truform Section)
"VSyncControl_DEF"="1" (You can change here for 2,3,4 | 3 is for Dynamic and 4 is for Lock to monitor, You have to try and see)
"AAF_Mapping_SET"="0(Standard:2,Edge-detect:12) 2(Standard:2) 4(Standard:4,Edge-detect:12) 8(Standard:8,Edge-detect:24) 16(Standard:16)"
"AAF_Value_SET"="Standard:0,Edge-detect:3"
"ATMS"=hex:2d,00,33,00 (The Adaptive AA filter setting. Default value is 31,00 (Smooth +1). All values: Smooth 30 00, +1 Smooth 31 00, +2 Smooth 32 00, +3 Smooth (Sharp) 33 00.)
"ATMS_DEF"="3" (same as above but numeric values)
"EQAA_DEF"="0"
"EQAAMapping_SET"="0(0:0,1:0) 2(0:2,1:2) 4(0:4,1:4) 8(0:8,1:8,2:16)"
"TemporalAAMultiplier_DEF"="0" (0,1,2,3 is Mode xAA means 3 is x8 Temporal so it's 32AA)
"ExportCompressedTex_DEF"="1" (Texture compresion Format for the Favour of Radeon GPU's)
"PixelCenter"=hex:30,00 ( Pixel Center On/OFF switch)
"PixelCenter_DEF"="0" (old ATI Tray Tweak - alternate Pixel center Tweak )
"EnableTripleBuffering_DEF"="0" (1 or 0 )
"DitherAlpha_NA"=hex:31,00 (here is HEX 31,00 means ON/1 and 30,00 means OFF/0 )
"ZFormats_NA"=hex:31,00 (here is HEX 31,00 means ON/1 and 30,00 means OFF/0, Z Stencil Format 16/24/32 Bits )
"ForceZBufferDepth_DEF"="0" (old ATI Tray Tweak, 0 default means 32Bit, 1=16Bit and 2=24Bit)
"TemporalAAMultiplier_NA"=hex:30,00 (here is HEX 31,00 means ON/1 and 30,00 means OFF/0 )
"CatalystAI"=hex:31,00 (Radeon AI Texture Filtering switch)
"CatalystAI_DEF"="1" (1 means AI is ON for OFF put 0 and in above option put hex:30,00 it's a Good Tweak for Benchmarking )
"Tessellation_OPTION"=hex:30,00 (Give your Value for Tesselation Override, usefull for FPS Gains with no Hudge Quality Impact = 32/24/16/8 Best for Q is 32)
"GI"=hex:31,00 (Geometry Instancing is ON)
"EnableCrossfireForNonProfileApps_DEF"="0" (Try enabling This for better CF)
"EnableCrossfireForNonProfileApps"="0" (this and upper must be set to 1)
================================================== ==============================
[HKEY_LOCAL_MACHINE\SYSTEM\CurrentControlSet\Contro l\Class\{4d36e968-e325-11ce-bfc1-08002be10318}\0000\UMD\DXVA]
"DXVA_WMV"=hex:30,00 (Radeon Video H/W Acceleration ON/OFF)
"WhiteBalanceCorrection_DEF"="1"
"3to2Pulldown"=hex:31,00,00,00
"3to2Pulldown_DEF"="1"
"CameraShake_ENABLE_DEF"="0"
"InternetVideo"=hex:31,00,00,00 (ON for YouTube etc. H/W decoding)
====================================================
Pro TIP:
You can easily Export the 0000 and UMD section to file and Edit Preffered Options so next Time when driver change you can just Import Desired Tweaks into registry !
Ofcourse you'll have to Cut all besides desired Options,
Open it in Notepad/Notepad++ and Edit ;-)
Example for non Power Users:
Windows Registry Editor Version 5.00
[HKEY_LOCAL_MACHINE\SYSTEM\CurrentControlSet\Contro l\Class\{4d36e968-e325-11ce-bfc1-08002be10318}\0000]
"GI_NA"="0"
"AreaAniso_NA"="0"
"AAF_NA"="0"
"Detail_NA"="0"
"Denoise_NA"="0"
"SplitScreen_NA"="0"
"StaticGamma_NA"="0"
"Gamma_NA"="0"
"EQAA_NA"="0"
"MLF_NA"="0"
"EnableUlps_NA"="1"
"SurfaceFormatReplacements_NA"="0"
[HKEY_LOCAL_MACHINE\SYSTEM\CurrentControlSet\Contro l\Class\{4d36e968-e325-11ce-bfc1-08002be10318}\0000\UMD]
"AAF_Value_SET"="Standard:0,Edge-detect:3"
"Main3D_DEF"="3"
"AnisoType_DEF"="0"
"AnisoDegree_DEF"="0"
"TextureOpt_DEF"="0"
"TextureLod_DEF"="0"
"TruformMode_DEF"="0"
"VSyncControl_DEF"="1"
Name your file as Catalyst Tweak (will be 1 file after editing 2 the 0000 and UMD)
Remeber to add .REG after name: Catalyst_Tweak.REG double click and Merge ! Reboot and its done.
Good Luck Radeon Users.
Can Just somebody Program some Tweak Utility with that Options like in RP or ATI Tray?
Just Hook it into Registry !
Now we have our Coder :D
Here are screens where to find Tweaks. Some in CAT and some in Tray

================================================== =========================
===============================
If you prefer Reshade+SweetFX 2.0 then disable SweetFX 1.5.1 in RadeonPRO
Like here ->

Also you can ->Just Merge into REG this 2 files i make for you :-)
Or look into this files in Notepad (click Edit) and make similar in your registry.
That's safe aproach, cuz sometimes H/W code is different in registry.
Click Run and write regedit then enter
(Please do BackUp, in Registry/Computer -> Export All)
Here are the Reg merge files ->
My MEGA Cloud
or Ziped Reg Files
All files are there for You :-)
System Mods, RadeonPRO + SweetFX 1.5.1 and OpenAL etc.
in Directory / Zz Gamers Soft You NEED
========================================
Here interesting Tweak i make with Legacy MOD FLEM (Ver 2.0) ->
Download here Digital FLEM All Radeons MOD !
The Disable DMAcopy Is working OK and there's a small boost in Low side FPS ! Tweak IT
And in Shadow Of Mordor Ultra/High with Ultra Textures i have:
-> Now 54FPS average and 40FPS Low
-> before 52FPS average and 29FPS Low
So we have first Great Tweak for GCN using FLEM -> THX goes to Creators !

Warning GCN !
The BlockWrite Tweak now with CAT 15.9.1 Beta works Perfect so enable it with DMA Copy !
================================================== =========================
The Registry Tweaking Guide for Radeon GPU's !
Open Regedit (click Run and enter: regedit ) Find Driver section:
[HKEY_LOCAL_MACHINE\SYSTEM\CurrentControlSet\Contro l\Class\{4d36e968-e325-11ce-bfc1-08002be10318}\0000]
Interesting Features/Options Highlight:
Shortcut NA means not avaible/selectable so the NA=0 means is Avaible !
and dword:00000000 ( last digit 0 is OFF and 1 is ON )
Please reboot after Tweaking !
--------------------------------------------------------------------------------------------------"GI_NA"="0" (ability to turn OFF Geometry Instancing, Avaible in Task CAT Icon only! )
"AreaAniso_NA"="0" (turns On better Aniso Filtering, also more demanding and looks better, Avaible in Task CAT Icon only!)
"AAF_NA"="0" (turns ON more AA Options, Avaible in Task CAT Icon only!)
AntiAlias_NA (gives Options in Tray/CAT for more AA options)
"EQAA_NA"="0" (Enchanced Quality Mode for AA, More demanding, avaible in CAT AA dropdown )
"TemporalAAMultiplier_NA"="0" (Yet another usefull AA menagment, you can go to 32xAA ! )
"MLF_NA"="0" (ON/OFF Morphological AA in CAT)
"Gamma_NA"="0" (Set Gamma in Movies/Games ?)
"SurfaceFormatReplacements_NA"="0" (in CAT you can turn ON/OFF the Texture compresion Format for the Favour of Radeon GPU's, I have ON, something wrong with Textures try OFF ;-) )
TFQ_NA (texture Filtering Quality -> gives Option in Tray for Aniso Quality if OFF/0)
"TextureLod_NA"="0" (Turns ON ability to Crank Up textures renderig Quality to VeryHigh, default in Drivers ON)
"CameraShakeMotionDetect_NA"="1" (CAT Video Section related)
"EnableUlps"=dword:00000001 (It means GPU will save Power 300/150 for Desktop or Web crusing ;-) )
"KMD_EnableLPT"=dword:00000000 (Kernel mode setting, see Wiki, I think its for Older GPU's Reg entrie, For GCN it's Obsolete)
"3D_Refresh_Rate_Override_DEF"=dword:00000000 (Refresh overide ON/OFF so 00 is OFF and 01 is ON, change only last digit ! )
"Display_Detection_DEF"=dword:00000000
"Panning_Mode_DEF"=dword:00000000
"Force_TV_Detection_DEF"=dword:00000000 (no need for Guide here ;-) )
"ACE"=hex:31,00 (ACE is ON if you wanna OFF change to 30,00)
"KMD_FRTEnabled"=dword:00000001 (Frame Rate limiTer FRT Enabled )
"KMD_MaxFrameRateRequested"=dword:0000003d (here is my 61FPS, you can set whatever you'll need 30,120,144 etc. Remember it's HEX value!)
"VgaCompatible"=dword:00000000 (OLD Games don't work? turn that baby ON, along with: Legacy Components/DirectPlay in Windows Features )
"Adaptive De-interlacing"=dword:00000001 (is ON Feasibility of real-time applications is given as well as the coding efficiency tested by the Audio Video coding Standard (AVS) Great and New Technique for De-interlacing Videos)
"VPE Adaptive De-interlacing"=dword:00000001 (is ON Analog filter adaptation using a dithered linear search algorithm, another Great and New Technique for De-interlacing Videos)
StaticGamma_NA (Static Gamma for Movies)
"ASTT_NA"="1" (Adaptive Sampled Transparent Textures, AA on textures with transparency which did not have proper 8bit alpha)
"DALNonStandardModesBCD1" and "DALNonStandardModesBCD2" (basicly you can enter here your desired Resolution with Refresh rate, it is Default for Games etc. - my example: 17,92,13,44,00,00,00,90 it means: 1972:1344 in 90Hz)
"EnableLBPWSupport"=dword:00000000 (?)
"PP_MCLKStutterModeThreshold"=dword:00030000 (GPU to Monitor Delay Times in ms, We don't know too much about it but feel free to experiment, Try 15000/7500/5000/3000/2000 or for 1ms LCD 1000)
"StutterMode"=dword:00000002 (This is Stutter Mode Switch, avaible Options are: 0,1,2 - 0 means OFF)
"KD_TilingMode"=dword:00000000 (I think is Old School Tiling Texture Mode, default is OFF for GCN )
"AdapterDesc"="AMD Radeon R9 200 Series"
"ColourDesktopGamma_DEF"="1.0 1.0 1.0" (this is for Desktop + Movies Playback Calibrations)
"ColourDesktopBrightness_DEF"="0 0 0"
"ColourDesktopContrast_DEF"="1.0 1.0 1.0"
"ColourFullscreenGamma_DEF"="1.0 1.0 1.0" (this one is for Fullscreen Colour etc. Calibrations e.g. For My CRT i have 1.2 Gamma)
"ColourFullscreenBrightness_DEF"="0 0 0"
"ColourFullscreenContrast_DEF"="1.0 1.0 1.0"
"Display_Detection_DEF"=dword:00000000 (Monitor Detection Switch 1/0 ON/OFF )
"EdidPersistenceIsOn"=hex:00 (EDID Monitor Persistence Override)
"Panning_Mode_DEF"=dword:00000000 (Panning mode on Monitor switch 1/0 ON/OFF )
! Great Tweak -> in Radeon Reg. Tweak now avaible:
"DisableDMACopy"=dword:00000001 ( is not Direct Memory Access! IMO, is a GPU to VRAM related Tweak - It's Safe Approach to give 0 keep it enable. You have to test it in 1 and see what's best for You, some people including me have FPS Gain in Desabled State - Crysis3, BF4, HoM&M VII)
"DisableBlockWrite"=dword:00000000 ( Result in faster writing of graphics information to the VRAM, You can Enable it in GCN 1 or 0 )
Another Great Tweak for Dx9 Games FPS Boost (you'll have to put this in TXT.REG and merge, I've e-mail this to our coder so it will be in RadeonMOD):
"KMD_APlusISharedMiniSegmentSize"=dword:000004 14
"KMD_APlusISharedMiniSegmentOptions"=dword:0000041 7
================================================== ========================
And Now another section the UMD ->
[HKEY_LOCAL_MACHINE\SYSTEM\CurrentControlSet\Contro l\Class\{4d36e968-e325-11ce-bfc1-08002be10318}\0000\UMD]
"GI_DEF"="1" (DEF means Definition and is basicly for ON=1 or OFF=0 and sometimes you can set there 2,3,4 )
"Main3D"=hex:33,00 (Main3D - Filp Queue Size. Render Frames ahead, default option is 3 Frames Ahead, always set like this: 30,00 - 35,00 etc and see Next)
"Main3D_DEF"="3" (Must be set like above. Avaible switches: 0,1,2,3,4,5)
"AreaAniso_DEF"="0" ( Follow above rule eg. 0 = App. controled, 2,4,8,16 Forced Mode)
"AnisoType"=hex:30,00 (it means is App. controled, we can lower it for FPS boost but we will have lower Image Quality: 32,00-31,36 )
"AnisoDegree"=hex:31,00 (it means is ON and have 360 degree, i think we can lower degree for FPS boost but we will have lower Image Quality)
"AnisoDegree_DEF"="1" (is ON combined with above option )
"TextureOpt"=hex:30,00 (give 31,00 No Visible Quality loss but increase in FPS and fater Texture drawing/See down)
"TextureOpt_DEF"="0" (is Texture Optimisation Tweak, 1 for ON)
"TextureLod"=hex:31,00 (Texture Level of Detail switch 31,00 means ON)
"TextureLod_DEF"="-1" (Texture Level of Detail switch, You can give sharp to blurry, for More sharp give: -1 for blurry: 1)
"TruformMode_DEF"="0" (OLD trueform is OFF the Teselation predecessor, You can turn it ON for eg. in NWN2 and games that support it, more in Wikipedia Truform Section)
"VSyncControl_DEF"="1" (You can change here for 2,3,4 | 3 is for Dynamic and 4 is for Lock to monitor, You have to try and see)
"AAF_Mapping_SET"="0(Standard:2,Edge-detect:12) 2(Standard:2) 4(Standard:4,Edge-detect:12) 8(Standard:8,Edge-detect:24) 16(Standard:16)"
"AAF_Value_SET"="Standard:0,Edge-detect:3"
"ATMS"=hex:2d,00,33,00 (The Adaptive AA filter setting. Default value is 31,00 (Smooth +1). All values: Smooth 30 00, +1 Smooth 31 00, +2 Smooth 32 00, +3 Smooth (Sharp) 33 00.)
"ATMS_DEF"="3" (same as above but numeric values)
"EQAA_DEF"="0"
"EQAAMapping_SET"="0(0:0,1:0) 2(0:2,1:2) 4(0:4,1:4) 8(0:8,1:8,2:16)"
"TemporalAAMultiplier_DEF"="0" (0,1,2,3 is Mode xAA means 3 is x8 Temporal so it's 32AA)
"ExportCompressedTex_DEF"="1" (Texture compresion Format for the Favour of Radeon GPU's)
"PixelCenter"=hex:30,00 ( Pixel Center On/OFF switch)
"PixelCenter_DEF"="0" (old ATI Tray Tweak - alternate Pixel center Tweak )
"EnableTripleBuffering_DEF"="0" (1 or 0 )
"DitherAlpha_NA"=hex:31,00 (here is HEX 31,00 means ON/1 and 30,00 means OFF/0 )
"ZFormats_NA"=hex:31,00 (here is HEX 31,00 means ON/1 and 30,00 means OFF/0, Z Stencil Format 16/24/32 Bits )
"ForceZBufferDepth_DEF"="0" (old ATI Tray Tweak, 0 default means 32Bit, 1=16Bit and 2=24Bit)
"TemporalAAMultiplier_NA"=hex:30,00 (here is HEX 31,00 means ON/1 and 30,00 means OFF/0 )
"CatalystAI"=hex:31,00 (Radeon AI Texture Filtering switch)
"CatalystAI_DEF"="1" (1 means AI is ON for OFF put 0 and in above option put hex:30,00 it's a Good Tweak for Benchmarking )
"Tessellation_OPTION"=hex:30,00 (Give your Value for Tesselation Override, usefull for FPS Gains with no Hudge Quality Impact = 32/24/16/8 Best for Q is 32)
"GI"=hex:31,00 (Geometry Instancing is ON)
"EnableCrossfireForNonProfileApps_DEF"="0" (Try enabling This for better CF)
"EnableCrossfireForNonProfileApps"="0" (this and upper must be set to 1)
================================================== ==============================
[HKEY_LOCAL_MACHINE\SYSTEM\CurrentControlSet\Contro l\Class\{4d36e968-e325-11ce-bfc1-08002be10318}\0000\UMD\DXVA]
"DXVA_WMV"=hex:30,00 (Radeon Video H/W Acceleration ON/OFF)
"WhiteBalanceCorrection_DEF"="1"
"3to2Pulldown"=hex:31,00,00,00
"3to2Pulldown_DEF"="1"
"CameraShake_ENABLE_DEF"="0"
"InternetVideo"=hex:31,00,00,00 (ON for YouTube etc. H/W decoding)
====================================================
Pro TIP:
You can easily Export the 0000 and UMD section to file and Edit Preffered Options so next Time when driver change you can just Import Desired Tweaks into registry !
Ofcourse you'll have to Cut all besides desired Options,
Open it in Notepad/Notepad++ and Edit ;-)
Example for non Power Users:
Windows Registry Editor Version 5.00
[HKEY_LOCAL_MACHINE\SYSTEM\CurrentControlSet\Contro l\Class\{4d36e968-e325-11ce-bfc1-08002be10318}\0000]
"GI_NA"="0"
"AreaAniso_NA"="0"
"AAF_NA"="0"
"Detail_NA"="0"
"Denoise_NA"="0"
"SplitScreen_NA"="0"
"StaticGamma_NA"="0"
"Gamma_NA"="0"
"EQAA_NA"="0"
"MLF_NA"="0"
"EnableUlps_NA"="1"
"SurfaceFormatReplacements_NA"="0"
[HKEY_LOCAL_MACHINE\SYSTEM\CurrentControlSet\Contro l\Class\{4d36e968-e325-11ce-bfc1-08002be10318}\0000\UMD]
"AAF_Value_SET"="Standard:0,Edge-detect:3"
"Main3D_DEF"="3"
"AnisoType_DEF"="0"
"AnisoDegree_DEF"="0"
"TextureOpt_DEF"="0"
"TextureLod_DEF"="0"
"TruformMode_DEF"="0"
"VSyncControl_DEF"="1"
Name your file as Catalyst Tweak (will be 1 file after editing 2 the 0000 and UMD)
Remeber to add .REG after name: Catalyst_Tweak.REG double click and Merge ! Reboot and its done.
Good Luck Radeon Users.
Can Just somebody Program some Tweak Utility with that Options like in RP or ATI Tray?
Just Hook it into Registry !
Now we have our Coder :D
Here are screens where to find Tweaks. Some in CAT and some in Tray

================================================== =========================
===============================
If you prefer Reshade+SweetFX 2.0 then disable SweetFX 1.5.1 in RadeonPRO
Like here ->
================================================
This is List af known Radeon Registry Tweaks, based on ATI Tray Tool and RadeonPRO:
Standard Tweaks
Geometry Instancing: This is covered in the Catalyst Control Center section of the guide, and should be enabled in most cases.
Force Mip-Map Filter: Enabling this option improves the quality of textures in some games, although ideally you should use the regular Mipmap Detail Level setting to control Mipmap quality.
Z Compression: Controls the compression of the information held in the Z-Buffer. By enabling higher levels of compression (such as 'High'), you will see a performance improvement, but you may also see graphical anomalies. Default is the normal and recommended option, as it already provides some level of compression without image quality loss.
Fast Z Clear Enable: If enabled this option increases performance by clearing the Z-Buffer more quickly. As such it should always be enabled (ticked). Only untick this option if you experience Z-Buffer-related problems and want to experiment to see if this is the cause of it. Disabling Fast Z Clear will reduce performance noticeably.
Z Mask: Z Mask when enabled uses your graphics card hardware to prevent the Z-Buffer from being filled with unnecessary information. Strangely, many users report faster performance with Z Mask disabled (unticked), as well as less likelihood of graphical anomalies, so I recommend unticking this option to begin with to see if it works for you.
Z Top Disable: The Z buffer is not restrain by aplications.
Disable DMA Copy: I am unclear what this option does, but it is unticked by default, and it's not Direct Memory Acess. What i see is more FPS in all games i play: Crysis3, BF4, UE3 & UE4 also benefit with DisableDMACopy=1
Disable Block Write: Using Block Write should result in faster writing of graphics information to the VRAM, but some people report performance issues with it enabled (unticked) as it may be queing information instead of writing it immediately. So if you want to experiment, untick this option, try your favorite games or graphics benchmark and see if performance has improved or decreased for you. I recommend Enable it (see Radeon Tweaks in Main 1st Pg.)
WMV Acceleration: This setting is available in the regular CCC. It should be enabled to provide hardware accelerated Windows Media Video playback. (Today is always On)
==============================
Advanced Direct3D Tweaks
As the title suggests, these tweaks only work in Direct3D games, and have no impact on OpenGL games. Fortunately most games are Direct3D; there are very few OpenGL games (Doom/Quake-based games are OpenGL).
Fog Options: There are a range of Fog-related options here, including the option to enable hardware support for Table Fog, W Fog, Z Fog, Vertex Fog and Discrete Fog. For all intents and purposes you shouldn't need to manually enable/disable these, as your graphics card hardware should automatically provide support for the appropriate fog rendering method a game requires. However if the fog effects in a particular game look odd or incorrect - especially older games - I suggest firstly making sure Table Fog (Pixel Fog) support is enabled, then W Fog, and finally enable the other options if you still have problems. These options are really only for troubleshooting purposes.
Export W Buffer: This option enables W Buffer support for games which use it. The W Buffer is an alternate depth rendering technique to the Z Buffer. You should tick this, however ticking this option doesn't force-enable the W Buffer on recent ATI cards because they may not have hardware support for W Buffer usage in the first place.
Fast Color Clear: Enabling this should result in improved performance without noticeable image quality drop, as color information is cleared more quickly from the frame buffer. However it should already be enabled by default in the hardware, even if not indicated here.
VoltxEnable: This option controls support for Volumetric Textures, which should be enabled.
Color Compression: Enabling this should result in improved performance without noticeable image quality drop by compressing color information and hence allowing more information to fit into Video RAM. This should already be enabled by default in your hardware, even if it's not indicated here.
Export MipMap Cube Maps: Enabling this should provide support for Mipmap textures on Cube Maps. Cube Maps are a trick to show reflections of surroundings on static reflective object surfaces with minimal performance cost, and Mipmaps are a series of pre-scaled textures used to improve rendering performance as an object recedes into the distance. Once again, this should already be on by default, but you can tick it to make sure it's enabled.
Export Signed Vol Textures: I have no idea what this setting does. I assume it allows support for a particular Volumetric Texture type/method.
Line AA Enable: This option refers to Line Antialiasing - antialiasing which only works on lines, not the outlines of shaded or filled objects (e.g. powerlines in a 3D game). Enable this and test in a game to see if thin standalone lines become less jagged at the cost of some performance.
Enable Raster Guardband: This option controls Hardware T&L Guard Band Clipping, which is an optimization technique to improve video performance by only clipping (removing) certain portions of the 3D world, and this in turn saves CPU time. It should be enabled by default, but enable it here anyway. Only disable if you notice a reduction in performance or you see visual glitches.
Allow Macro Volume Textures: I have no idea what this setting does. I assume it allows support for a particular Volumetric Texture type/method.
Force Compressed Stencil Buffer: The Stencil Buffer is shared with the Z Buffer and most often controls effects like shadows in games. Ticking this option forces the stencil buffer data to be compressed, which may improve (or hurt) performance depending on the game; you should experiment to see which works best for you.
Constant Compare Enabled: I have no idea what this setting does.
Support for Non power of two size textures: This option enables support for non-standard texture sizes, and should be enabled.
Support for Displacement Maps: Unlike Bump Maps which are a trick to simulate bumps, scratches and dents in objects, Displacement Maps allow objects to show actual depth characteristics, even when viewed from the side for example. This technique is used in recent games, so support for it should always be enabled.
Adaptive NPatch Support: N-Patch is an ATI-developed technology for making 3D surfaces more realistically curved, and is used by ATI's TruForm technology. However this requires support in games to function properly, and most games do not support TruForm or N-Patch.
Tiling Settings: These settings control support for various texture surface tiling methods. I recommend enabling them all, as they all should be supported by your graphics card and may be used in particular games to improve performance as necessary.
Advanced OGL Tweaks
These tweaks only apply to Old and New OpenGL games, such as those based on the Doom/Quake/Rage/Wolfenstein engines.
Force Vertex Cache for Iris: I have no idea what this setting does.
DitherAlpha: If enabled, Alpha Textures - that is textures with transparent areas (like chain link fences) - will be dithered. This means the colors are blended more smoothly and hence should look better. Disabling this may resolve any visual glitches and may improve performance in OpenGL games, but will show more color banding (i.e. more noticeable color gradation).
Disable FGL AGP: Not clear what this setting does, perhaps it's related to disabling the ATI FireGL graphics card series' AGP function.
Export OpenGL 2.0 Procedures: Should be enabled, as this provides support for OpenGL 2.0 functions. You should only disable this if an OpenGL game or application is not functioning properly.
Multi Thread Support
Enable MT Support: If you have a multi-thread capable CPU, that is either a dual/multi core CPU, or a CPU with HyperThreading (virtual dual core) technology, you can enable this option for a potential performance improvement. You should leave the 'Minimum Working Threads' to 0 and set the 'Maximum Working Threads' to a value like 2 to start with. Play some recent 3D games and see if you get an actual improvement in performance, and also note if there is any additional instability caused. If it remains stable and you also notice a performance improvement, raise the Maximum value to 4, 6 or 8 for example and again experiment. In New CAT Drivers it's Native now, so driver have full access to CPU resources. Bigest gain in Win_X x64 and Win 8.1 !
=============================
Based on ATI Catalyst Tweak Guide by Koroush Ghazi and my experience with Radeon Tweaking from ATT X1950, 3850 and R280X.
Many of them (Options) are in CAT Registry today.
=======================================================
Also for AMD FX x8 Users ->
AMD FX x8 Optimizer BDC R1.03B
AMDx8_Optimizer_BDC_R1.03B
Also for x6 x8 etc. CPU users You'll need to unpark CPU Cores to Boost Performance in x2 x4 Games/Apps
Cuz' Still some Modern Games don't utilise more than 4 cores ! So you'll have to UnPark Them and Gain some Performance !
-> Read and Download Here ->
Disable-CPU-Core-Parking-Utility
======================================
CrossFire in Every Game !
Download RadeonPro and create a that Game profile.
Force the crossfire profile 'AFR Friendly D3D' and set the MVPUMode to 'Alternate Frame Rendering'.
then Force in RP desired FPS eg. 60/120/144 etc.
And its Done :D
Also in MSI AFTERBURNER !
CLICK SETTINGS GEAR (COG)
THEN FIRST PAGE -> General Tab
LAST HEADER AT THE BOTTOM -> AMD compatibility properties
Unofficial overclocking mode ->
DROP-DOWN BOX ->
without PowerPlay support
It makes difference for Fury X (and x2) + R3xx !
===================================================
And now as for CPU's from AMD (the Phenom/FX one with SSE etc. new instructions set)
Using this simple and intuitive application, you can easily patch files that were compiled with the Intel Compiler for better performance
Intel Compiler Patcher is a comprehensive piece of software developed to offer you the means of tweaking certain EXE, DLL, ACM, AX, CPL and OCX by default files that were compiled using Intel C++ Compiler from your computer and optimize them for your processor by deactivating their CPU Dispatcher, thus increasing their general performance when run on other types of CPUs.
Scan your folders and choose the files you want to patch
Program makes backup files in patched file directory with ext. .org
www.softpedia.com/get/Intel-Compiler-Patcher
===========================================
PhenomII and FX series CPU's will have a little OC touch to Gain some Hidden Performance:
ALways set FSB to min 232-243 or if you have Great Mobo give it a try and set >260FSB !! it will unlock CPU some GT/s also the wider the better !
Next TIP:
PhenomII series ->
NB always 2.8GHz no less ! (important for Memory bandwidth )
HT always 2.3GH or 2.5GHz (important for GPU's)
PhenomII x6 -> OC to MAX 4.1GHz (no need for More)
Sweet spot is 3.8GHz-4Ghz
PhenomII x4 -> OC to MAX 4.5GHz (no need for More)
Sweet spot is 4Ghz-4.2GHz
FX series ->
NB always 2.6GHz but no more ! (important for Memory bandwidth )
HT always min. 2.6GHz (important for GPU's)
FX x6 OC to MAX 4.5GHz (no need for More)
Sweet spot is 4.2GHz
FX x8 OC to MAX 5GHz (no need for More)
Sweet spot is 4.2GHz-4.5GHz
Also remember to rise a little V on NB,HT etc. in BIOS
===========================================
Also Great for Gamers and Audio Maniacs.
The Timer Resolution Tweak to 0.5 millisecond !
No More stutering/tearing on LCD Monitors.
Also Great for CRT gamers -> game responce is much quicker.
Timer Resolution
THX to Creator below original Web Page:
Mr. Lucas Hale Web
===========================================
Now Intel CPU's:
Always give some OC to it
SB i5/i7 give 4.2-4.8GHz
IB/Haswell give MAX 4.4GHz
Extreme i7 x6 give MAX 4.2GHz to 4.4GHz (no need for more)
Extreme i7 x8 give MAX 4.0GHz-4.2GHz (no need for more)
Warning ! You'll need Good CPU Cooler (not BOX!)
Also rise a little CPU Vcore for Stability !
Tweak some PLL also ;-)
Temps should be around 68-75 deg.cels. MAX (its safe here)
Of course the MAX is the MAX ;-)
Files You'll need are in FOLDER/Zz Gamers Soft You NEED
=====================================
My PhenomII x6 on Sabertooth 990FX OC for Gaming.
Screen:

==========================================
Another great Performance Tweak:
MFT Zone Size:
HKEY_LOCAL_MACHINE/SYSTEM/CurrentControlSet/Control/Filesystem
Select Filesystem and then in the right pane double-click on the item NtfsMftZoneReservation
Change the value to 1 – 4 to change the reserved disk space of the MFT file:
Value 1: 12.5% of free space, default
Value 2: 25% of free space (that's best for every Gamer)
Other Values:
Value 3: 37.5% of free space
Value 4: 50% of free space
========================================
Also in BIOS Turn OFF HPET or in Win 7/8.1
1. Go to Device manager and expand the "System Devices" section.
2. Look for High Precision Event Timer. Right click on it and click disable.
It will give you some more Procesing Power to Games (more FPS)/Apps (faster)
It's the same Gain for AMD or Intel CPU's !
Also:
Run CMD with Administrator Rights and copy this:
And Turn ON/OFF HPET:
bcdedit /set useplatformclock true
bcdedit /set tscsyncpolicy Enhanced
bcdedit /set disabledynamictick yes
bcdedit /deletevalue useplatformclock
bcdedit /deletevalue tscsyncpolicy
bcdedit /deletevalue disabledynamictick
To view bcdedit settings:
bcdedit /enum
==============================================
GodMode in Win_X let you customize every aspect of you'r Window's.
Generally it's for Power Users or People with solid background knowledge of that OS.
Create a new folder on your desktop: right-click on Windows 10 desktop and on the context menu, click on New > Folder.
Name this newly created folder:
GodMode.{ED7BA470-8E54-465E-825C-99712043E01C}
Enter that folder and..... everything you need is here :-)
================================================
Also some Tweaks for Gamers in Win_X :
Optimal online gaming experience Tweaks
If you want the optimal online gaming experience, go to Advanced tab of your Ethernet adapter settings, and disable the following:
* Interrupt Moderation - clumps packets together and sends them as a batch - the main offender
* Flow Control - sounds counterintuitive to disable it, but it messes with existing flow control in Windows networking stack
* Receive Side Scaling - also messes with Windows networking stack
* [anything goes here] Checksum Offload - supposed to speed up performance by offloading TCP/UDP checksumming to hardware; in reality does nothing for an average desktop PC except interfere with Windows networking stack
* Green Ethernet - performance-eating eco garbage
Try it and see -> more headshots in your favorite FPS, responsive gaming, less disconected issues etc etc.
Also, if you play a MMORPG and want faster responsiveness, you need to disable TCP/IP Nagle algorithm in Windows. There are multiple guides about it though.
Disable Telemetry Tweak Utility
Ultimate Windows Tweaker 4
Control Panel -> Admin Tools -> Shedule Tasks (window pops up)
All below can be safely Disabled (in Dir. Microsoft/Windows)
-> Application Experience *
-> Appx deployment Client *
-> Autocheck *
-> CloudExperienceHost *
-> Customer Experience Improvement Program * (customer sniffer ;-)
-> Diagnosis
-> Feedback\Siuf *
-> LanguageComponentsInstaller
-> Location *
-> Maintenance
-> Maps *
-> NetTrace *
-> Offline Files
-> PI (Secure-Boot-Update i Sqm)
-> Power Efficiency Diagnostics
-> Ras
-> RemoteAssistance
-> Shell (all but not this one - CreateObjectTask) *
-> SoftwareProtectionPlatform
-> SpacePort
-> TextServicesFramework *
-> Time Synchronization i Time Zone *
-> TPM
-> User Profile Service
-> WCM
-> WDI
-> Windows Defender *
-> Windows Error Reporting *
-> Windows Media Sharing *
-> Workplace Join *
Please Read !
*- means some sort of Customer sniffer (safe but unneeded for Gamers)
Free Up some resources thanks to that Tweaks.
If you have doubts just google the variables and see what you'll need.
Some of Tweaks not good for Laptops.
Some of them is for automated Maintenance in Win_X (i do maitenance by myself so its unneeded for me )
============================================
Windows 10: How to Protect Your Privacy and thanks to that Tweaks -> Free ~150-300MB in RAM and Net Speed/Ping
We Are Gamers we need every posible resources we can get ;-)
Stop Bone Collector ;-) (telemetry and Data Collection in Windows 10 )
Command Prompt/Power Shell as Admin
sc config DiagTrack start= disabled
sc config dmwappushservice start= disabledsc
stop DiagTracksc
stop dmwappushservice
run Gpedit.msc
>Administrative Templates>Windows Components> Data Collection and preview builds>allow telemetry
Set to Enabled/Disabled
1. Enabled (togle user control....)
2. Disabled
3. Default (as it is)
Atomated Scripts (THX goes to Sergey Tkachenko and Wade )
Also we can remove all Apps bundled with Win_X and leave Store and Calculator working (you can edit script in notepad ;-)
Here ->
Tweak Script
Run As Admin or Paste to Comm.Prompt as admin
Automated script to Permanently STOP Telemetry and Data Collection + Some related Net Tweaks also
Here ->
Tweak Download
Also after Sign-in into M.S Account and Win_X Activation Process you can Log-in into Local Account.
Important -> Make Sys BackUp (You can Revert to previous state ;-)
Update 1
Now i can clearly show you better option (less invasive and Win_X works as usual with some boost ;-)
run Gpedit.msc
>Administrative Templates>Windows Components> Data Collection and preview builds>allow telemetry
and here change only second option (give disabled)
Next:
HKLM\SOFTWARE\Policies\Microsoft\Windows\
Here create Key
DataCollection
and give Dword32 Value:
AllowTelemetry and write 0 (means Disabled)
Now Windows Update should work as intended :banana:
And we have freed some resources and Ping :D
Also in Settings/Updates/Advanced Options Change how Upd. are delivered to Only My PC (not in Network, that option will seed updates to others as well -> You can Keep it or Disable it)
Win_X Block/Unblock Updates -> Total control of Update Delivery (if you don't need some of'em, just Turn it OFF :pc1: )
Here link for MpS Hide/Show Updates:
wushowhide.diagcab Download
Another usefull Tweak to turn OFF Net Usage associated with Win Telemetry ;-)
Please add following to the HOSTS ( C:\Windows\System32\drivers\etc )
First click right button and T.Off the Read Only ;-)
After That you will Have much Better PING and Net Responsivness.
Great for Multiplayer Games PING !
0.0.0.0 vortex.data.microsoft.com
0.0.0.0 vortex-win.data.microsoft.com
0.0.0.0 telecommand.telemetry.microsoft.com
0.0.0.0 telecommand.telemetry.microsoft.com.nsatc.net
0.0.0.0 oca.telemetry.microsoft.com
0.0.0.0 oca.telemetry.microsoft.com.nsatc.net
0.0.0.0 sqm.telemetry.microsoft.com
0.0.0.0 sqm.telemetry.microsoft.com.nsatc.net
0.0.0.0 watson.telemetry.microsoft.com
0.0.0.0 watson.telemetry.microsoft.com.nsatc.net
0.0.0.0 redir.metaservices.microsoft.com
0.0.0.0 choice.microsoft.com
0.0.0.0 choice.microsoft.com.nsatc.net
0.0.0.0 df.telemetry.microsoft.com
0.0.0.0 reports.wes.df.telemetry.microsoft.com
0.0.0.0 wes.df.telemetry.microsoft.com
0.0.0.0 services.wes.df.telemetry.microsoft.com
0.0.0.0 sqm.df.telemetry.microsoft.com
0.0.0.0 telemetry.microsoft.com
0.0.0.0 watson.ppe.telemetry.microsoft.com
0.0.0.0 telemetry.appex.bing.net
0.0.0.0 telemetry.urs.microsoft.com
0.0.0.0 telemetry.appex.bing.net:443
0.0.0.0 settings-sandbox.data.microsoft.com
0.0.0.0 vortex-sandbox.data.microsoft.com
0.0.0.0 survey.watson.microsoft.com
0.0.0.0 watson.live.com
0.0.0.0 watson.microsoft.com
0.0.0.0 statsfe2.ws.microsoft.com
0.0.0.0 corpext.msitadfs.glbdns2.microsoft.com
0.0.0.0 compatexchange.cloudapp.net
0.0.0.0 cs1.wpc.v0cdn.net
0.0.0.0 a-0001.a-msedge.net
0.0.0.0 statsfe2.update.microsoft.com.akadns.net
0.0.0.0 sls.update.microsoft.com.akadns.net
0.0.0.0 fe2.update.microsoft.com.akadns.net
0.0.0.0 diagnostics.support.microsoft.com
0.0.0.0 corp.sts.microsoft.com
0.0.0.0 statsfe1.ws.microsoft.com
0.0.0.0 pre.footprintpredict.com
0.0.0.0 i1.services.social.microsoft.com
0.0.0.0 i1.services.social.microsoft.com.nsatc.net
0.0.0.0 feedback.windows.com
0.0.0.0 feedback.microsoft-hohm.com
0.0.0.0 feedback.search.microsoft.com
0.0.0.0 rad.msn.com
0.0.0.0 preview.msn.com
0.0.0.0 ad.doubleclick.net
0.0.0.0 ads.msn.com
0.0.0.0 ads1.msads.net
0.0.0.0 ads1.msn.com
0.0.0.0 a.ads1.msn.com
0.0.0.0 a.ads2.msn.com
0.0.0.0 adnexus.net
0.0.0.0 adnxs.com
0.0.0.0 az361816.vo.msecnd.net
0.0.0.0 az512334.vo.msecnd.net
=======================================
Clear the log located in “C:\ProgramData\Microsoft\Diagnosis\ETLLogsAutoLogger”
Remove both Tele. services:
Disable: Set the “Start” registry key for both services to 4 (Disabled) [3 is Manual, 1 & 2 Auto]
Located at “HKEY_LOCAL_MACHINESYSTEM\CurrentControlSet\Services”
1. diagnosticshub.standardcollector.service
2. DiagTrack
PS. Also in that Logs (we can Open it using HexEditor ;-) I've noticed that MS don't collect any of Private Info about User !!!
All in there (You can check by yourself) is related to Windows and Drivers etc. eg. SB-Z, Razer and so on...
So i think it's little misunderstanding So called Data Private Collection (security concerns etc.)
But in BF4 multi I got 6-8 PING Gain !!! -> Yeah
===========================================
Also make change in reg:
Windows Registry Editor Version 5.00
[HKEY_LOCAL_MACHINE\SOFTWARE\Microsoft\Windows NT\CurrentVersion\Multimedia\SystemProfile]
"NetworkThrottlingIndex"=dword:ffffffff
"SystemResponsiveness"=dword:00000000
[HKEY_LOCAL_MACHINE\SOFTWARE\Microsoft\Windows NT\CurrentVersion\Multimedia\SystemProfile\Tasks\Games]
"Scheduling Category"="High"
"SFIO Priority"="High"
"Background Only"="False"
"Priority"=dword:00000001
"Clock Rate"=dword:00002710
"GPU Priority"=dword:00000001
"Affinity"=dword:00000000
Please copy this into text document .txt
and rename it to PowerPlan.reg and merge into registry d.click :-)
========================================
Games don't work/Start or Save?
Right click on Games/Steam/Users etc. Folder and Security (also is good to check all Games Folders)
Advanced and change ownership - write Administrators (wait and close all)
Then after that (in Security Tab) click in EDIT and edit Admin/Authenticated Users and Users Permissions to Full Controll !
Also is good to Have in all of that folders the /Users/ Profile with Full Control !
Now games will Save Game and run NP !
Work in Se7eN, 8ight and Win_X !
============================================
Now some SB-Z Tweaks you might need for Gaming
Tested on 5.1 Configuration.
New Working WHQL Drivers for Win_X
Creative_SBz_6.0.102.0037_Win_X
All you need is Install PAX Modified Drivers from my Cloud/SB_Zx folder
or from PAX in here ->
New PAX For Win_X THX Robert :-)
PAX for Win_X SB-z etc.
HardwareHeaven Forum
You can have OpenAl sound positioning in almost every game :-)
Plus OpenAL is faster than DX and Fully Utilise Creative SB Hardware !
Sometimes you have to experiment with options in Alchemy, first try mine then if don't work as should make default (its OK to almost every Game)
=====================================
Also in Windows 7/8/10 you can make application to run as many cores you have in your CPU (grat for real x6 or x8 cores)
Make shortcut on desktop then -> properties
Here you go, some commands (look into screen) ->
In some games you have additional options for .exe eg.:
commands after prefix "->full path<- always="" br="">
-cpuCount=4 (utilise 4 cores)
-cpuCount=6 (8,12,16 etc.)
register -high (make High priority for app.)
-vsync=0 (no Vsync)
-nologos
Should look like this:
"-cpuCount=6 -high"
Also for pCars and many other games:
-dx11mt -pthreads 6 -fpscap 65 -novr
-fpscap 65 (it's FPS Cap in pCars)
-novr (its no Virtual Reality Support Googles)
-pthreads 12 or 4/6 etc.
These two options works with every DX11 game:
-dx11mt -pthreads 6
For STEAM/Origin/Uplay
============================================
Normal approach for shortcut .exe files eg. games or software:
All commands you have in command prompt:
put line: start /?
Here example for Cheat Engine 64bit exe to work on 3rd core only with normal priority:
C:\Windows\SysWOW64\cmd.exe /C START "cheatengine-x86_64.exe" /affinity 8 "C:\Program Files\Cheat Engine\cheatengine-x86_64.exe"
And example for Witcher 3 Game (BOX/GoG ver.)
To run with All 6 cores with abovenormal priority:
C:\Windows\SysWOW64\cmd.exe /C START "witcher3.exe" /abovenormal /affinity 40 "G:\@Giery\The Witcher 3 Wild Hunt\bin\x64\witcher3.exe"
Its Binary multiply of 2 so 1st/0core is 1 then 2nd is 2 and so on to 6th core with is core 05 in manager, so binary is 20 and all 6 cores are 40 (6x8).
0core=1
1st=2
2nd=4
All six cores = 40 (4x8)
Also you can make game runs with high priority.
/normal
/abovenormal
/high
Or you can simply download RunWithAffinity 1.0.2
RunWithAffinity 1.0.2
Configure the .exe shortcut by this free software ;-)
==========================================
Also some options for ARMA II & III series and other Games and apps:
"-cpuCount=6 -high -noSplash -maxMem=5120 -maxvram=3090 -exthreads=6"
Always use youre H/W config settings there (that one is mine ;-)
Some games utilise spare core resources verry well eg. Rage/new Wolfenstein and many others -> so you easily can set more
ex. for:
Phenom II x4 -cpuCount=8
Phenom II x6 -cpuCount=12 or -pthreads 12
FX x6 -cpuCount=12
FX x8 -cpuCount=16 or -pthreads 16
How to screen:

=======================================
==============================
====================
=========
===
=
GAMES TWEAKS And Tips !!
******************
FrostBite Engine Games can benefit from this Tweaks:
Works with: BF:4 BF:H SW:BF and NFS games etc
Remember not every FB Game uses the same Visuals for Rendering !
if you Moded the Game and it won't start head here and check the Values used by it in the config location (open with Notepad or NP++)
eg. BF4 -> C:\Users\Your Name\Documents\Battlefield 4\settings
file = PROFSAVE_profile
RenderDevice.MantleEnabled 1 (Mantle API, and now thx to it we have VULCAN API)
RenderDevice.Dx11Enable 1 (DX11.0 base)
RenderDevice.Dx11Dot1Enable 1 (DX11.1 for Radeons, uses ACE)
RenderDevice.Dx11Dot1RuntimeEnable 1 (tick this too )
RenderDevice.TripleBufferingEnable 0
Thread.MaxProcessorCount 8 <- br="" cores="" cpu="" here="" physical="">WorldRender.TransparencyShadowmapsEnable 0
WorldRender.MotionBlurEnable 0
WorldRender.MotionBlurForceOn 0
WorldRender.MotionBlurFixedShutterTime 0
WorldRender.MotionBlurMax 0
WorldRender.MotionBlurQuality 0
WorldRender.MotionBlurMaxSampleCount 0
WorldRender.SpotLightShadowmapEnable 0
WorldRender.SpotLightShadowmapResolution 256
WorldRender.LightTileCsPathEnable 0
WorldRender.PlanarReflectionEnable 0
RenderDevice.RenderAheadLimit 2
PostProcess.DynamicAOEnable 0
PerfOverlay.DrawFps 1 (shows FPS)
GameTime.MaxVariableFPS 75 (FPS CAP)
<- br="" cores="" cpu="" here="" physical="">Mass Effect: Andromeda performance guide:
<- br="" cores="" cpu="" here="" physical=""> My settings:
Make: USER.CFG in ME:A folder:
<- br="" cores="" cpu="" here="" physical="">RenderDevice.Dx11Enable 1
RenderDevice.Dx11Dot1Enable 1
RenderDevice.Dx11Dot1RuntimeEnable 1
thread.processorcount 8
RenderDevice.ForceRenderAheadLimit 3
GameTime.MaxVariableFps 61
GameTime.ForceSimRate 60
GameTime.MaxSimFps 60
EntityFrustumCull.Enable 1
EntityGridRenderQuery.UseTracingTerrainShadowCulli ng 1
WorldRender.MotionBlurEnable 0
WorldRender.MotionBlurForceOn 0
<- br="" cores="" cpu="" here="" physical="">======================================
Wolfenstein The New Order/Wolfenstein The Old Blood
Some Optimalisation/Performance/Best Visual Options for OpenGL Engine used in Rage/Wolfenstein The New Order/Wolfenstein The Old Blood:
c:\Users\*YourName*\Saved Games\MachineGames\Wolfenstein The Old Blood\base\wolftobConfig.cfg (please set it to Read Only !!)
add in shortcut: "+toggle com_synctotime" (good for 120Hz LCD)
jobs_numthreads 6 (CPU cores)
r_usehardwaretextures 1
vt_pageImageSizeUnique "8192" (texture related)
vt_pageImageSizeVmtr "8192"
vt_pageImageSizeUniqueDiffuseOnly2 “8192″
vt_pageImageSizeUniqueDiffuseOnly “8192″
vt_useCudaTranscode “0″ (1 for nV GPU's)
vt_useOpenCLTranscode "1" (for AMD GCN)
vt_uncompressedPhysicalImages “1″
image_anisotropy “16″
image_useCompression “0″
vt_maxPPF “64″
vt_lodbias “-2″ (sharp textures)
hands_fovscale 1.0 (no weird FOV)
view_blur_max 0 (no Blur)
view_blur_min 0
r_postprocessdofmode 1 (DOF Off if 0 )
r_skippostprocess 1 (skip all effects)
Here is my Config:
s_voiceVolume_dB "3.721107"
jobs_numthreads 12
r_initialMonitor "0"
r_mode "13"
m_sensitivity "2.976041"
vt_uncompressedPhysicalImages "1"
vt_lodbias "-2"
r_multiSamples "2"
image_lodbias "-2"
image_anisotropy "16"
image_useCompression "0"
in_joystick "0"
vt_useOpenCLTranscode "1"
r_usehardwaretextures 1
vt_pageImageSizeUnique "16384"
vt_pageImageSizeVmtr "16384"
vt_pageImageSizeUniqueDiffuseOnly2 “16384″
vt_pageImageSizeUniqueDiffuseOnly “16384″
vt_useCudaTranscode “0″
vt_maxPPF “128″
vt_lodbias “-2″
hands_fovscale 1.0
view_blur_max 0
view_blur_min 0
===========================================
pCARS Optimalisation and Tweaks:
Please make sure to add command for shortcut in Stem
Right Click on Game then Properties and Set Launch Options and add:
-cpuCount=6 (add how many cores you have eg. 4,6,8)
and set Priority for EXE to Above Normal or High
Also it's better on Moded Drivers for Win8.1 from Win10 build (install via Device Manger) All files on my Mega or
Read Here -> Guru3D Moded Catalyst
also Disable Grass, and make shadows on MEDIUM -> looking nice IMO
I have Ultra/High med Shadows, no AA in game, SMAA from Reshade.
Download Reshade + SweetFX 2.0 beta 8 and point to game + change reshade DLL for dxgi.dll (64bit)
For Lazy ones -> Here i give You my settings:
-> MEGA link for My Reshade
Just Unpack into pCars folder in Stem. (its 64bit reshade for 64bit pCars)
01=================10
UPD.2 Now we can drive with Better Visuals and with Particles/Grass ON !
Particles+Grass = 290 or better GPU.
Also I have some Optimisation files from Better optimised games
Just copy to p_Cars folder (make BackUp ! )
Also it works for other games (of sort ;-)
Optimised Files for ATI GCN
In Future i will Test some FC4 files, maby that is better optimised?
Stay tuned Gamers :D
========================================
The Witcher 3 :
The Witcher 3\bin\config\base\rendering.ini
->
HairWorksAALevel (default is 8) give 2 or 0
GrassDensity=1600 (Uber is 2000)
root\documents\Witcher 3\User.Settings
Mine in [ ]
cvMaxAllowedLightsNonShadows=40 - 25 [40]
cvMaxAllowedSpeedTree=5000 [1000 ]
cvMaxAllowedCharTextures=209715200 - give 30% less [209015200]
cvMaxAllowedDecalsSS=160 - 90 [150]
StripeHideDistance=60 - 40 [50]
CascadeShadowDistanceScale2=1.5 - 1.0
TextureStreamingDistanceLimit=200 - 160 [300]
MaxAtlasTextureSize=2048 512,1024 to 4096 ( 4096, 2048 is OK)
TerrainReadAheadDistance=140 - 90 [300]
MaxTextureSize=2048 512,1024 - [4096]
HairWorksLevel=2 Hairworks [0]
TerrainScreenSpaceErrorThreshold=1.6
MaxTerrainShadowAtlasCount=4
MaxCubeShadowSize=512 give 256 [512]
TextureInFlightCountBudget=12
TerrainErrorMetricMultiplier=6
CascadeShadowmapSize=3072 - give 1024, 2048 [512 with CascadeShadowQuality=1]
Also give read only after edited .cfg files.
Also in RP+SweetFX is better to Give HBAO AO on Ultra/High or Medium and turn Off HBAO+ in Witcher 3 :-) Looks Better IMO and + 5-7FPS gain.
Game runs Stable with Average 50+ FPS with Uber/High and custom settings !
Looks fenomenal Great Slavic Game.
Settings for RP.SweetFX 1.5.1 is in my MEGA cloud.
Here How to in RadeonPRO ->


It look like this with my SweetFX ->


======================================
Assassins Creed Unity Performance Tips & Tweaks
The AC:U Ini file:
DisplayWidth=1792
DisplayHeight=1344
RefreshRate=85
WindowMode=2
VSync=0
Stretching=0
EnvironmentQuality=3 (3 is Very High)
TextureQuality=3 (2 is Ultra)
ShadowQuality=0 (its Low)
SSAO=2
Bloom=1
AntiAliasingMode=0
Tessellation=1 (it's advanced Tesselation, work properly With HBAO+ Only)
First for Radeon users -> Run RadeonPRO with Admin and AC:U also change to run as admin (for Stability, no crashes or bugs)
Set for LCD dynamic framerate control to eg. 60Hz/120Hz/144Hz how much your LCD can. +2 so it will be 62/122/146 -> Untick Vsync in AC:U
Next set your SweetFX etc.
As for nV players do the same in nV CP -> set desired LCD refresh=FPS +2 and its done.
Due to very hot summer, i have my XFX on 1050/1550 1.175v +8%POW now! (60-64 degrees celsius after 5-8h !)
My settings when playing AC:U -> Res: 1792:1344 85Hz All Ultra High with HBAO+ but Shadows is Low (max recomended is Medium) and Details are on Very High (also recomended)
Disable AA in Game and Use SMAA inject in RP (my SMAA is in the screenshot of RP below)
Also for some FPS gain make it use x32 or x48 tesselation instead x64/x128
Also some of the screens are taken when i'm playing with Options and AA SMAA in RP (0.8/16/6/12 or 0 ;-)
Also for better performance one need to disable Geometry Instancing !
in Registry -> {4d36e968-e325-11ce-bfc1-08002be10318} the 0000 string
GI_NA value name 0 (after that Tweak you'll see the GI in 3D settings but only in Task Bar ;-)
and UMD string
GI_DEF = 0 (default is 1 and you beter change that after AC:U ;-)
All you do when CCC.exe and MOM.exe is disabled in Task Manager then Log Off
In my current build i'm using AA in CAT screen below (updated)->
The GI is hard coded in CATALYST so is always ON
For The AA please use build in RP SMAA option:
Best (low Impact)
R280 and X (0.8/12/6/30, 12 or 0)
R290 and Up (0.8/16/6/25, 12, 0)
============================================
Alien: Isolation - Performance Tips & Tweaks
Here some new ALien:I Tweaks -> Game looks incredible, tweaked + RadeonPRO & SweetFX
-> Tweaks and backup - Looking Great !
=====================================
Might & Magic: Heroes VII -> Game & Editor RMG Optimistaions + Tweaks !
In C:\Users\*YourName*\My Documents\My Games\Might & Magic Heroes VII\MMH7Game\Config folder you'll find
==============================================
Some Performance/Quality Optimalisations:
MMH7Engine.ini ->
[Engine.Engine]
MaxProcBuildingLODColorTextureSize=2048
MaxProcBuildingLODLightingTextureSize=512
UseProcBuildingLODTextureCropping=False
ImageReflectionTextureSize=1024
[Core.System]
MaxOverallCacheSize=60
[TextureStreaming]
MinTextureResidentMipCount=7
PoolSize=640
MemoryMargin=80
[WinDrv.WindowsClient]
AudioDeviceClass=XAudio2.XAudio2Device (here you can try OpenAL -> AudioDeviceClass=ALAudio.ALAudioDevice )
[XAudio2.XAudio2Device]
MaxChannels=32 (here give more)
CommonAudioPoolSize=0
MinCompressedDurationGame=5
MinCompressedDurationEditor=4
LowPassFilterResonance=0.9
[ALAudio.ALAudioDevice]
MaxChannels=32 (here give more)
CommonAudioPoolSize=0
MinCompressedDurationGame=5
MinCompressedDurationEditor=4
LowPassFilterResonance=0.9
//DeviceName=Generic Software
============================================================
MMH7SystemSettings.ini ->
[SystemSettings]
MotionBlur=False (i don't like Blur)
AllowRadialBlur=False
MaxShadowResolution=1120 (i suggest don't Tweak it, but feel free to try)
MaxWholeSceneDominantShadowResolution=2048 (give more=Quality or Less=Performance.)
bAllowHardwareShadowFiltering=True
There is in this section lot more (feel free to experiment)
=============================================================
MMH7Game.ini ->
You can Make Larger Maps + Larger Battle Maps in RMG just edit this settings:
[MMH7Game.H7EditorCombatGrid]
cMinimumCombatGridWidth=8 -> here ;-)
cMinimumCombatGridHeight=6 -> here ;-)
cMaximumCombatGridWidth=40 -> here ;-)
cMaximumCombatGridHeight=30 -> here ;-)
[MMH7Game.H7EditorAdventureGrid]
cMinimumAdventureGridWidth=75
cMinimumAdventureGridHeight=75
cMaximumAdventureGridWidth=500 -> here ;-)
cMaximumAdventureGridHeight=500 -> here ;-)
cMaximumTileGradient=45 -> don't edit this one !
MapSizeDefinitions=(MapSize=E_H7_MS_SMALL, Width=75, Height=75)
MapSizeDefinitions=(MapSize=E_H7_MS_SMALL_BROAD, Width=100, Height=75)
MapSizeDefinitions=(MapSize=E_H7_MS_NORMAL, Width=100, Height=100)
MapSizeDefinitions=(MapSize=E_H7_MS_NORMAL_BROAD, Width=150, Height=100)
MapSizeDefinitions=(MapSize=E_H7_MS_BIG, Width=200, Height=200)
MapSizeDefinitions=(MapSize=E_H7_MS_BIG_BROAD, Width=300, Height=200)
MapSizeDefinitions=(MapSize=E_H7_MS_HUGE, Width=500, Height=500) -> here ;-)
Here you can hard code some Options:
[MMH7Game.H7ReplicationInfo]
cGameSpeed=1.0
cGameSpeedAdventure=1.40
cGameSpeedAdventureAI=1.45
cGameSpeedCombat=1.40
[MMH7Game.H7GUIGeneralProperties]
mDevHardwareCursor=True
mAmbientOcclusion=True
mLogState=True
mNoteBarStatus=True
mQALogState=True
mWeeklyEffectPopup=True
mShowBuildTreeAll=True
mSkipTactics=False
mHoverDecalEnabled=True
mAutoPlayDialogs=True
mAutosaveEnabled=True
mGameplayWaitsForAnim=True
mColorCodeModels=True
mShowHiddenBuffs=False
mShowHiddenBuffsLog=True
mShowHiddenEffects=False
[MMH7Game.H7AdventureGridManager]
cUseFogOfWar=true
[MMH7Game.H7FOWController]
cUseTrueFogOfWar=false (?)
[MMH7Game.H7CouncilPlayerController]
mRetroFilter=False (he he)
mAlwaysQuickCombat=True (that's good)
===============================================
BatMan: Arkham Knight Tweaks and tips :
turn Off movies at startup:
Program Files (x86)\Steam\steamapps\common\Batman Arkham Knight\BMGame\Movies
"Intro_BM3Logo_fire.usm" and "nv_logo.usm" give BAK at end nv_logo.usm.BAK ;-)
The 30FPS Framerate Cap:
\Batman Arkham Knight\BMGame\Config
"BmSystemSettings.ini"
please use notepad++ ;-)
find and change to:
MaxFPS=30.000000 to 60.000000 or 85.000000 etc.
after you finished editing your .ini file please save it !
and some usefull tweaks :
AllowD3D10=True
AllowOpenGL=True
TextureResolution=2
Bloom=False or True
Reflections=False or True
bEnableCrossfire=True
and
PhysXLevel=1 or 0
======================================================
Fallout 4 PC Performance and Optimization Tweaks
Still Under constuction

C:\Users\YourName\My Documents\My Games\Fallout4
In files: Fallout4Prefs.ini , Fallout4.ini
[Controls]
in this section of both files, just add line:
bMouseAcceleration=0
fMouseHeadingXScale= ( improve mouse aiming)
fMouseHeadingYScale= ( 2x the X scale for proper behaviour)
Fallout4.ini ->
[Display]
fShadowLODMaxStartFade=1000.0
fSpecularLODMaxStartFade=2000.0
fLightLODMaxStartFade=3500.0
iShadowMapResolutionPrimary=2048 (Shadows res. more= better, MAX 8192)
fMeshLODLevel1FadeDist=3500.0000
fMeshLODLevel2FadeDist=2000.0000
fMeshLODFadePercentDefault=1.2000
bNvGodraysEnable=1 (i have this set to ON)
[Interface]
fDefaultWorldFOV=75
fDefault1stPersonFOV=85
[Water]
bReflectLODObjects=0
bReflectLODLand=0
bReflectSky=1
bReflectLODTrees=0
Fallout4Prefs.ini ->
[Display]
bEnableWetnessMaterials=1
bEnableRainOcclusion=1
bSAOEnable=1
iShadowMapResolution=1024
iSize W=1792 (set Your resolution, but after that don't go to Fallout4Launcher.exe)
iSize H=1344
iPresentInterval=0 (v-sync)
bVolumetricLightingForceCasters=0 (if 1 is Better Lighting)
[Water]
bUseWaterDisplacements=1
bUseWaterRefractions=1
bUseWaterReflections=1
bUseWaterDepth=1
Best to do is Experiment (I have RadeonPRO + SweetFX 1.5.1 working NP ;-)
Invisible Lockpicking Bug: in Fallout4Prefs.ini
[Display]
iSize W=XXXX-1 (from your res subst. 1)
iSize H=YYYY-1
iSize W=1792 (this is mine)
iSize H=1344
change to
iSize W=1791
iSize H=1343
Vertical and Horizontal Mouse Movement: in Fallout4.ini
fMouseHeadingYScale=.021 -> fMouseHeadingYScale=XXXX
XXXX replace with:
.03738 if you have a 16:9 monitor.
.042 if you have a 21:9 monitor.
.028 if you have a 4:3 monitor.
.0336 if you have a 16:10 monitor.
Stay Tuned for more
******************************************************************************************
==============================================
Finally AMD/ATI Released the Kraken !
The Fury-X WC HBM GPU
Reviews are in The Web.
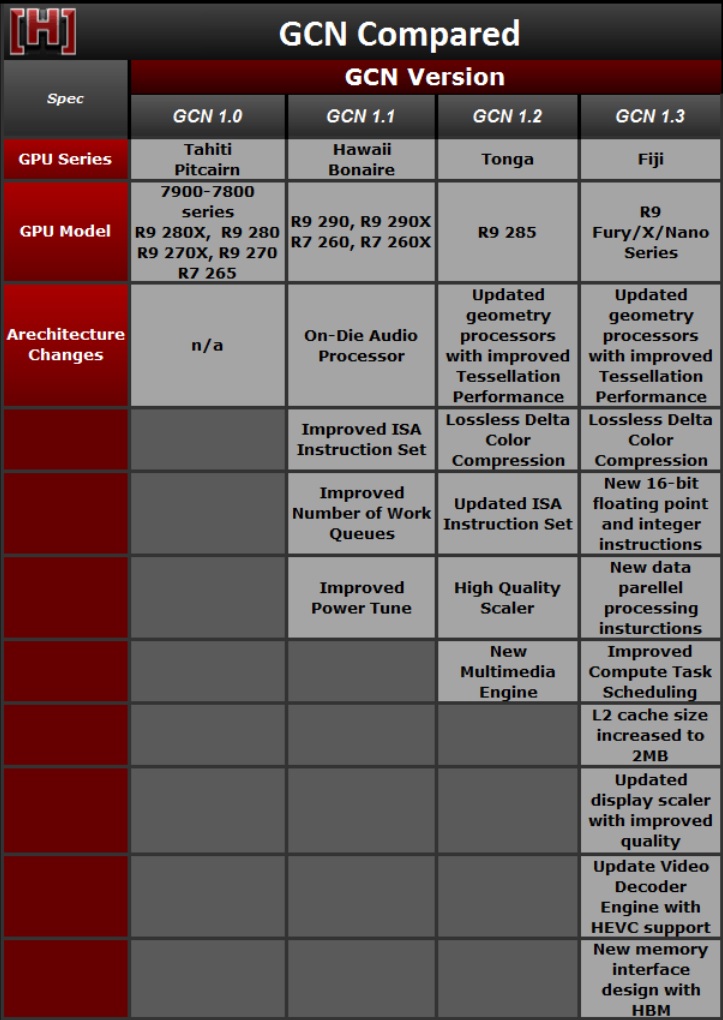


=====================================
Thank you for posting all this info and tweaks! Helped me improve Project Cars framerates on AMD FX and 270x.
ReplyDeleteOK, THX Bratan' :D Keep Tweaking....
ReplyDeleteGreat tips! Thanks for all your work. Do you have any tips for Fallout 4?
ReplyDeleteYes i will update Now (i have it on Guru3D lol)
DeleteBut i sometimes forgot ot update My OWN Blog ;-)
Blizzard needs to hire you to optimize heroes of the storm. Have you ever played this game? it runs terribly due to lack of engine optimization. If you figured out tweaks to fix that game you would be a god
DeleteJust to clarify, is this "Freesync enabled for everyone" mean that FreeSync is possible even without a monitor that contains/supports it?
ReplyDeleteTo get the best GPU performance on older systems, custom tweaks like RadeonPro and SweetFX are essential. Just like ModEngine2 allows deep modding for gameplay, these tools unlock hidden power for Radeon users.
ReplyDelete